
Introduction
BowTie is a barrier-based approach to managing risk. Its purpose is straightforward: to help you spot a risk, judge how serious it is, and put the right controls in place to keep it under control. What sets it apart is the diagram at its heart — a single picture that lays out how a risk might unfold and what stands in the way of it doing harm. That clarity is why organisations in so many sectors reach for it when they need to talk about safety and act on it.
This guide walks you through:
- What a BowTie is useful for
- How it can support your organisation
- The thinking behind the model
- What to look out for when you review one
Working through the parts of a BowTie is a practical way to surface your safety priorities and see where risk can be reduced. You don’t strictly need software to do it — but BowTie Pro™ makes the models far easier to build, revise, and share, exporting them in formats that suit everyone from the boardroom to the shop floor.
The BowTie method comes into its own in workshops. Gathering a team around a single diagram lets people challenge the risks, check that the barriers really exist, and show plainly how safety measures are put into practice and kept up.
How Does BowTie Work?
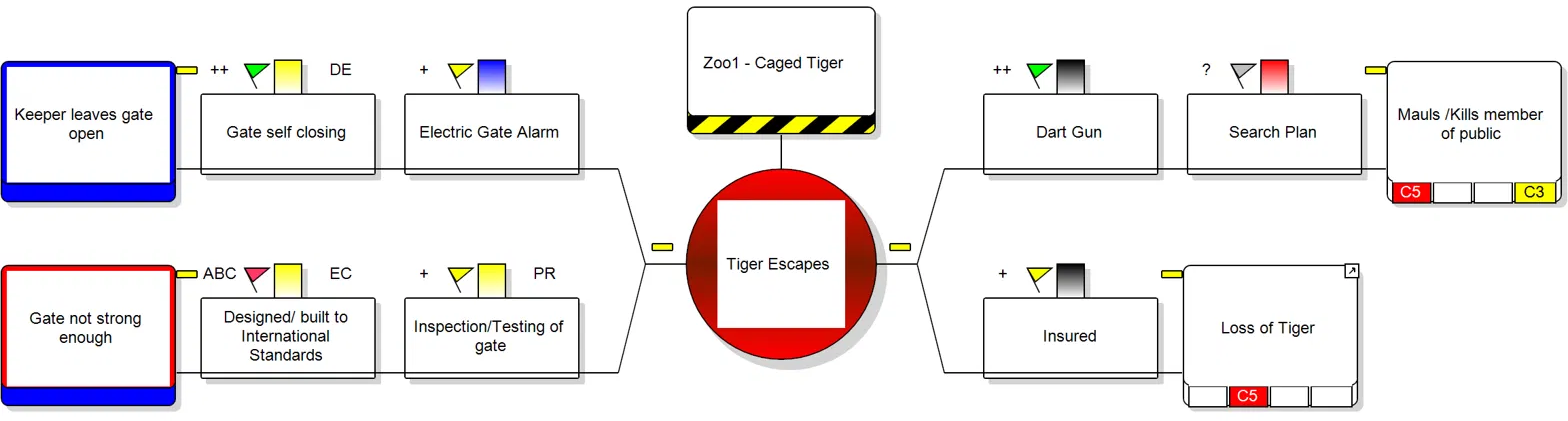
Every BowTie is built from a handful of building blocks that, together, tell the full story of a risk. Two of them sit at the centre:
- Hazard – a task, activity, or situation that carries the potential to cause harm.
- Top Event – the moment control is lost and the hazard is released.
From that centre point, the diagram fans out in two directions:
- Threats – the direct causes that could tip you into the top event.
- Consequences – the outcomes that could follow once it happens.
Barriers (or controls) are then placed to keep those risks in check, and they fall into two camps:
| Left side — Prevention | Right side — Recovery / Mitigation |
| Measures that remove a threat or stop it short of triggering the top event. | Measures that lessen how likely or how severe a consequence is once the top event has occurred. |
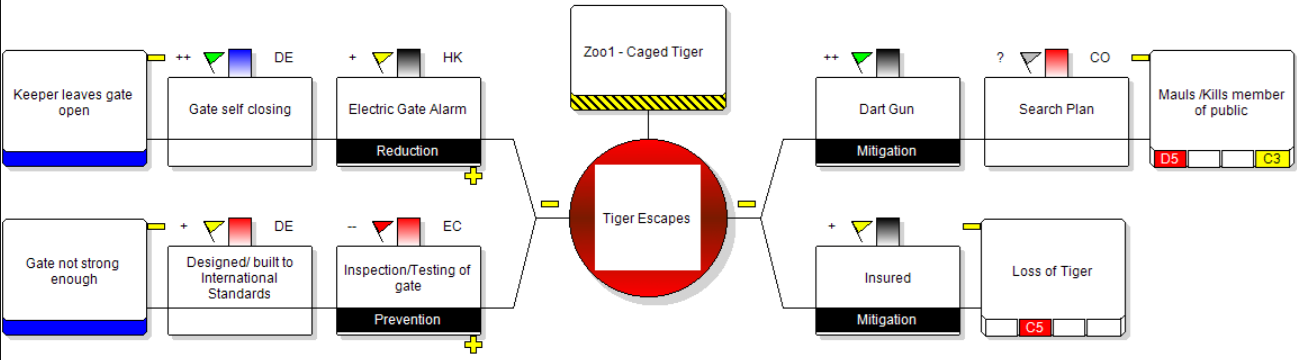
The model goes a step further by weighing up escalation factors — the conditions that can wear down or defeat a barrier. Where these exist, you can assign extra controls to keep them managed.
You can also layer in details such as how effective or how critical each barrier is, which lets a BowTie feed neatly into a wider Safety Management System (SMS).
What Does a BowTie Show?
At its core, BowTie models make visible the links between hazards, threats, controls, and consequences. Instead of a list of risks buried in a report, you get a structured view of exactly how your barriers stop incidents and soften their fallout.
A well-built BowTie helps you to:
- Present risk clearly and graphically
- Give both internal teams and outside stakeholders a shared view across domains
- Sharpen awareness of the areas that matter most
- Meet operational and regulatory safety expectations
- Pinpoint your critical controls and gauge how well they work
- Shape Safety Performance Indicators (SPIs) to keep those controls under watch
Because it is so flexible, the same model serves many purposes — proactive risk assessment, safety case work, training, incident analysis, and demonstrating compliance to a regulator.
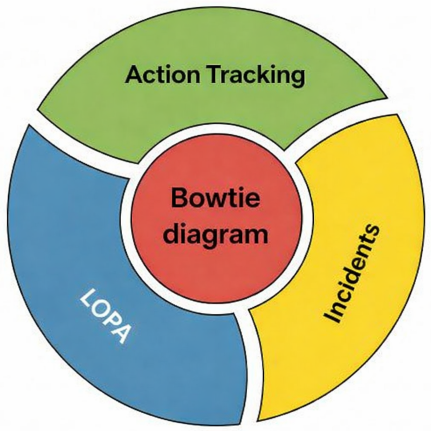
BowTie Pro: Connecting LOPA, Incidents, and Action Tracking
Within BowTie methodology, a BowTie diagram rarely works in isolation. In practice, it sits at the centre of a wider risk picture, tying together several related activities:
- LOPA (Layer of Protection Analysis) – tests whether your layers of protection are genuinely sufficient for the risk they guard against.
- Incidents – links real events back to the barriers that failed, so lessons feed straight into the model.
- Action Tracking – captures the follow-up work each review generates and keeps it moving to completion.
Bringing these strands around a single diagram means your BowTie stops being a static drawing and becomes a living part of how the organisation learns and improves.
Understanding Escalation Factors
One of the model’s real strengths is that it refuses to take barriers at face value. An escalation factor is a condition that raises risk by defeating a control or blunting its effectiveness. Rather than assuming a barrier will always hold, the BowTie prompts you to ask how it could fail — and then to add controls that keep that weakness in check.
Traps and tips
- Trap: vague statements such as “radio does not work.”
- Tip: spell out exactly why or how the control is weakened.
- Trap: so many escalation factors that the diagram becomes cluttered.
- Tip: keep only the factors that are credible and genuinely significant.
Escalation factor controls are the answer to these weaknesses. They manage the conditions that undermine other barriers, keeping your prevention and recovery measures dependable when it counts.
Where Did BowTie and BowTie Methodology Come From?
The method grew out of a simplified pairing of two established techniques: fault tree analysis and event tree analysis.
It was the oil and gas industry, during the 1990s, that formalised the approach and expanded its practical use as a way to get to grips with major hazards. From there it spread widely, and today you’ll find it applied across defence, healthcare, finance, mining, and aviation.
A Barrier-Based Approach to Risk
Many in the safety world already know Professor James Reason’s “Swiss cheese” model of how accidents happen. A BowTie is, in effect, a practical and visual way of putting that same barrier-based thinking to work.
The BowTie method shows how several layers of protection combine to hold incidents back — and how gaps in those layers can let a failure slip through. The approach also sits comfortably alongside the barrier-focused processes set out in safety management guidance.
Crucially, a BowTie doesn’t stop at naming the controls you have. It probes how those controls might fail, through escalation factors, and how you would manage that failure. That gives real insight into your overall risk strategy and where your resources are best spent.
As a qualitative tool, this barrier-based view is especially valuable in complex, fast-moving operations. It works looking forward, as a risk assessment, and looking back, as a way of classifying and analysing incidents.
Which Industries Use The BowTie Method?
BowTie can add value to almost any sector, but it pays off most in high-hazard, complex settings — the places where truly understanding threats, controls, and consequences is non-negotiable.
Sectors that regularly put it to work include:
- Oil & Gas (upstream, midstream, downstream)
- Chemical & process industries
- Mining & resources
- Aviation
- Construction & infrastructure
- Rail & transport
- Healthcare
- Utilities & energy (power generation, water)
- Defence & security
Why These Sectors Benefit Most
The method delivers the greatest return where an organisation faces:
- High-consequence, low-frequency risks
- Complex systems with many safeguards
- Regulatory or safety case obligations
- A need to communicate controls clearly and visually
- Critical control or barrier management programmes
Summary
The BowTie methodology offers a simple but powerful way to understand and manage risk, pairing visual clarity with structured analysis to support safer operations. By drawing hazards, threats, controls, and consequences into one picture — and by being honest about how barriers can fail — it gives organisations a practical, defensible basis for handling their most complex and high-impact risks.