The Action Tracking module in BowTiePro helps organizations manage, monitor, and follow up on actions related to hazards, controls, deficiencies, audits, and risk assessments.
It provides a centralized system for:
- Creating actions
- Assigning responsibilities
- Tracking progress
- Managing deficiencies
- Monitoring due dates
- Reviewing action status
The module supports ongoing operational risk management by ensuring corrective and preventive actions are properly documented and completed.
Purpose of Action Tracking
Action Tracking helps organizations ensure that identified issues and risk-related tasks are addressed in a structured and traceable manner.
Actions may be created from:
- Hazard reviews
- BowTie assessments
- LOPA studies
- Deficiency reviews
- Audits and inspections
- Incident investigations
- Operational observations
The module helps teams maintain accountability and visibility across all outstanding activities.
Key Features of Action Tracking
The Action Tracking module includes several core capabilities.
Action Creation
Users can create actions linked to specific hazards, controls, deficiencies, or operational findings.
Actions may include:
- Description
- Owner
- Priority
- Due date
- Status
- Supporting notes
Action Assignment
Actions can be assigned to responsible users or teams to ensure accountability and ownership.
Workflow Management
The module supports action lifecycle management, including:
- Open actions
- In-progress actions
- Review stages
- Closed actions
This helps organizations monitor completion progress effectively.
Deficiency Management
Deficiencies identified during reviews or assessments can be linked directly to actions for follow-up and remediation.
Board and List Views
Actions can be viewed using:
- List-based layouts
- Board-style workflow views
This provides flexibility for different operational and management needs.
Progress Monitoring
Users can monitor:
- Due dates
- Overdue actions
- Completion status
- Review progress
- Linked deficiencies
This helps improve operational visibility and follow-up management.
Benefits of Using Action Tracking
Using the Action Tracking module helps organizations:
- Improve accountability
- Reduce unresolved deficiencies
- Track corrective actions efficiently
- Improve audit readiness
- Strengthen operational risk management
- Maintain clear action ownership
- Improve visibility across teams
Relationship with Other BowTiePro Modules
The Action Tracking module integrates closely with:
- Hazards
- BowTie diagrams
- LOPA assessments
- Deficiency management
- Risk reviews
This integration helps organizations manage risks and follow-up activities within a single system.
Best Practices
When using Action Tracking:
- Create clear and actionable descriptions
- Assign responsible owners
- Set realistic due dates
- Regularly review overdue actions
- Keep action statuses updated
- Link deficiencies where applicable
Maintaining accurate action records helps improve operational control and long-term risk management.
The Action Tracking workflow in BowTiePro helps organizations manage corrective and preventive actions in a structured and traceable manner.
The workflow allows users to:
- Create actions
- Assign responsibilities
- Monitor progress
- Track deficiencies
- Review outstanding items
- Close completed actions
The module is designed to support operational risk management and ensure follow-up activities are properly managed.
Accessing the Action Tracking Module
To open the Action Tracking module:
- Log in to BowTiePro.
- Navigate to the top navigation menu.
- Select Actions.
The module opens on the Action List screen where users can search, filter, and manage actions.

Understanding the Workflow Structure
The Action Tracking workflow is designed around the lifecycle of an action from creation through completion.
A typical workflow includes:
- Action identification
- Action assignment
- Progress tracking
- Review and follow-up
- Action closure
Each action remains traceable throughout the process.
Action Lifecycle
Actions move through different operational stages during their lifecycle.
Open Actions
Newly created actions are initially considered open and require assignment and follow-up.
In-Progress Actions
Once assigned, actions may move into an active working state while corrective activities are being performed.
Review Stage
Actions may require review or verification before closure to ensure the issue has been resolved appropriately.
Closed Actions
Completed and approved actions can be closed once all required activities are finalized.
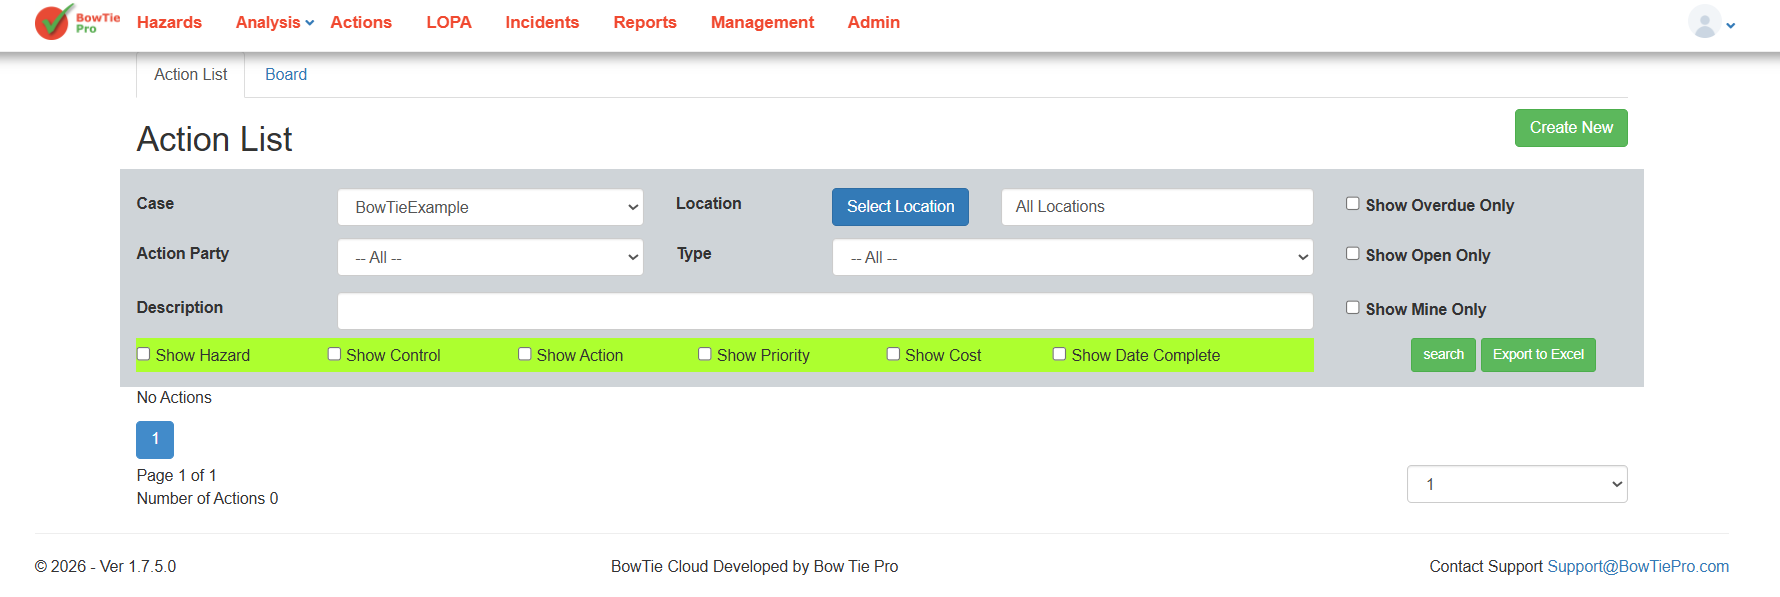
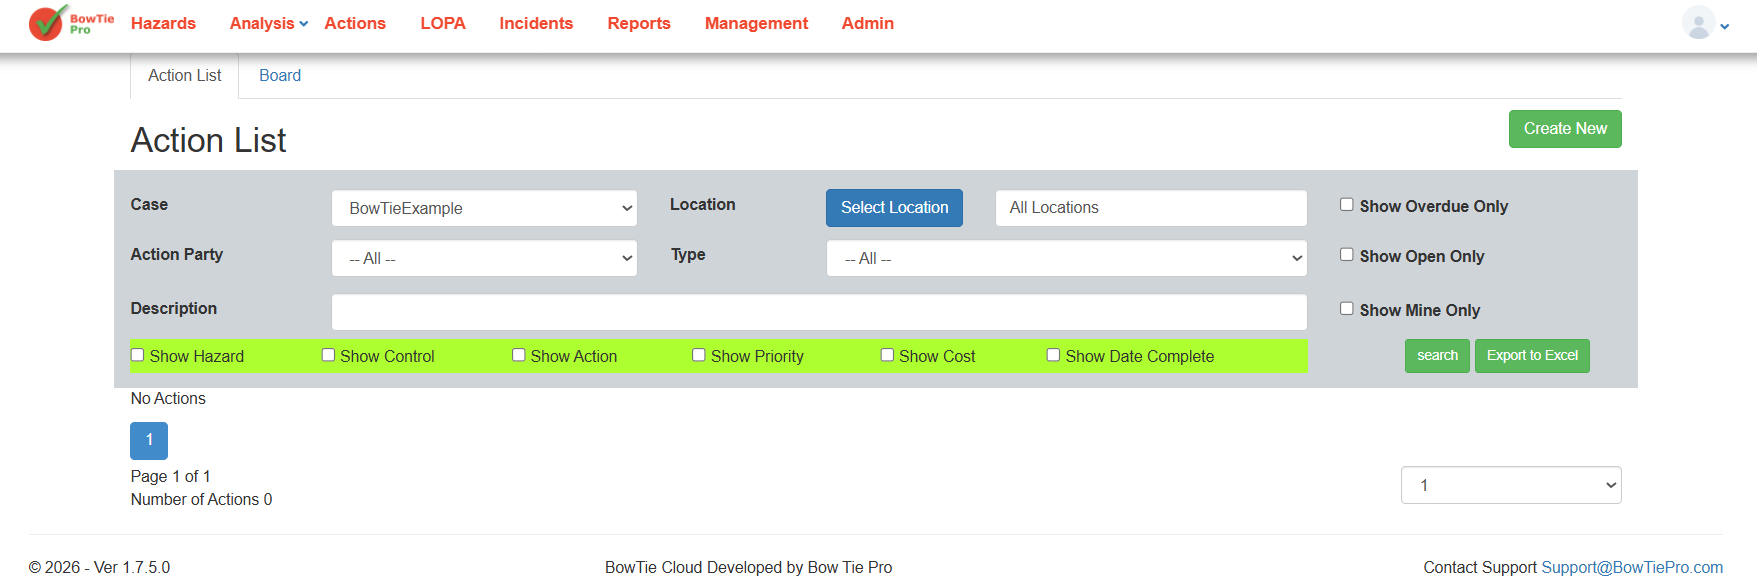
Using the Action List Screen
The Action List screen provides a centralized view of all actions within the selected case or location.
Users can:
- Filter actions
- Search by description
- View overdue items
- Display open actions only
- Export results to Excel
The list view helps users quickly identify outstanding work and monitor action status.
Understanding Action Details
Each action contains detailed information used throughout the workflow.
Typical action details include:
- Action description
- Responsible party
- Priority
- Target date
- Supporting notes
- Cost information
These details help teams manage accountability and progress tracking.
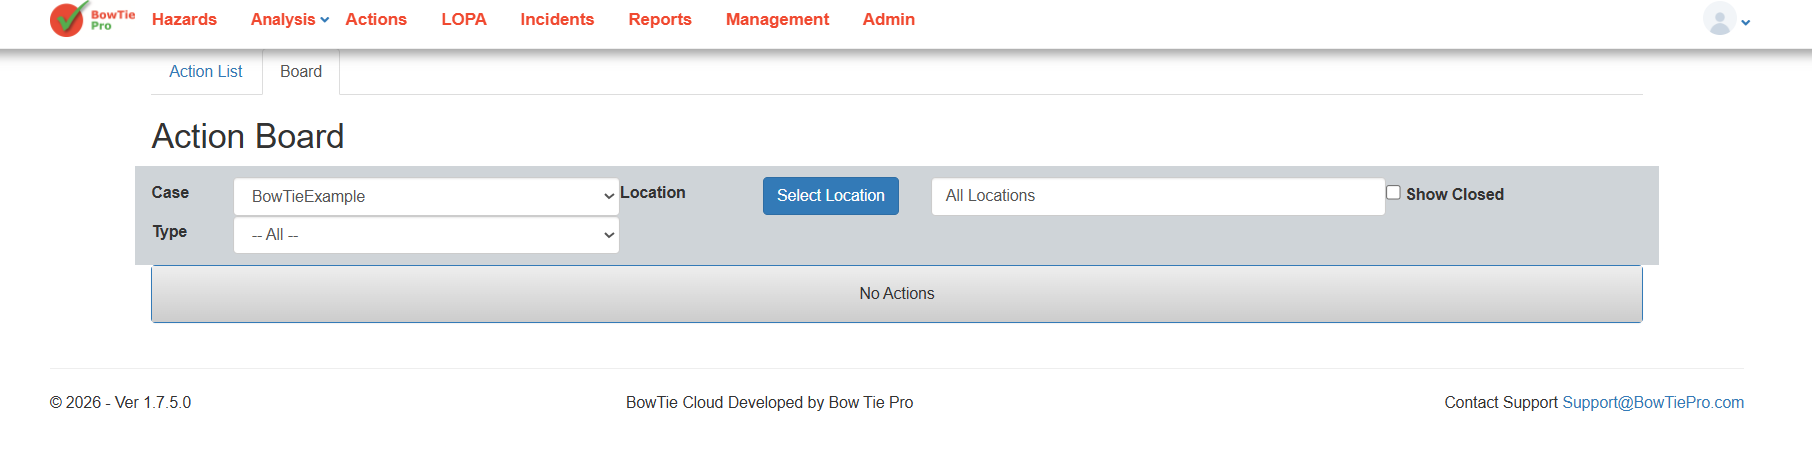
Using the Action Board View
The Action Board view provides an alternative visual layout for monitoring actions.
The board view helps users:
- Visualize workflow stages
- Review open items
- Track operational progress
- Monitor active deficiencies
This layout is useful for operational reviews and workflow monitoring.
Filtering and Monitoring Actions
Users can apply filters to:
- Show overdue actions
- Display open items only
- Show assigned actions
- Filter by type
- Filter by location
This helps improve visibility and operational follow-up.
Benefits of the Workflow
The Action Tracking workflow helps organizations:
- Improve accountability
- Monitor unresolved issues
- Maintain audit traceability
- Reduce missed follow-ups
- Improve operational oversight
- Ensure corrective actions are completed
Best Practices
When managing actions in BowTiePro:
- Keep action descriptions clear and specific
- Assign responsible owners
- Monitor overdue actions regularly
- Update action progress consistently
- Review actions before closure
- Use filters and board views for operational visibility
The Action Tracking module in BowTiePro allows users to create, assign, and manage actions related to operational risks, deficiencies, audits, and assessments.
Actions help organizations ensure that identified issues are properly tracked and resolved through a structured workflow.
Accessing the Action Tracking Module
To create a new action:
- Log in to BowTiePro.
- Navigate to the top navigation menu.
- Select Actions.
- Open the Action List screen.
- Click Create New.
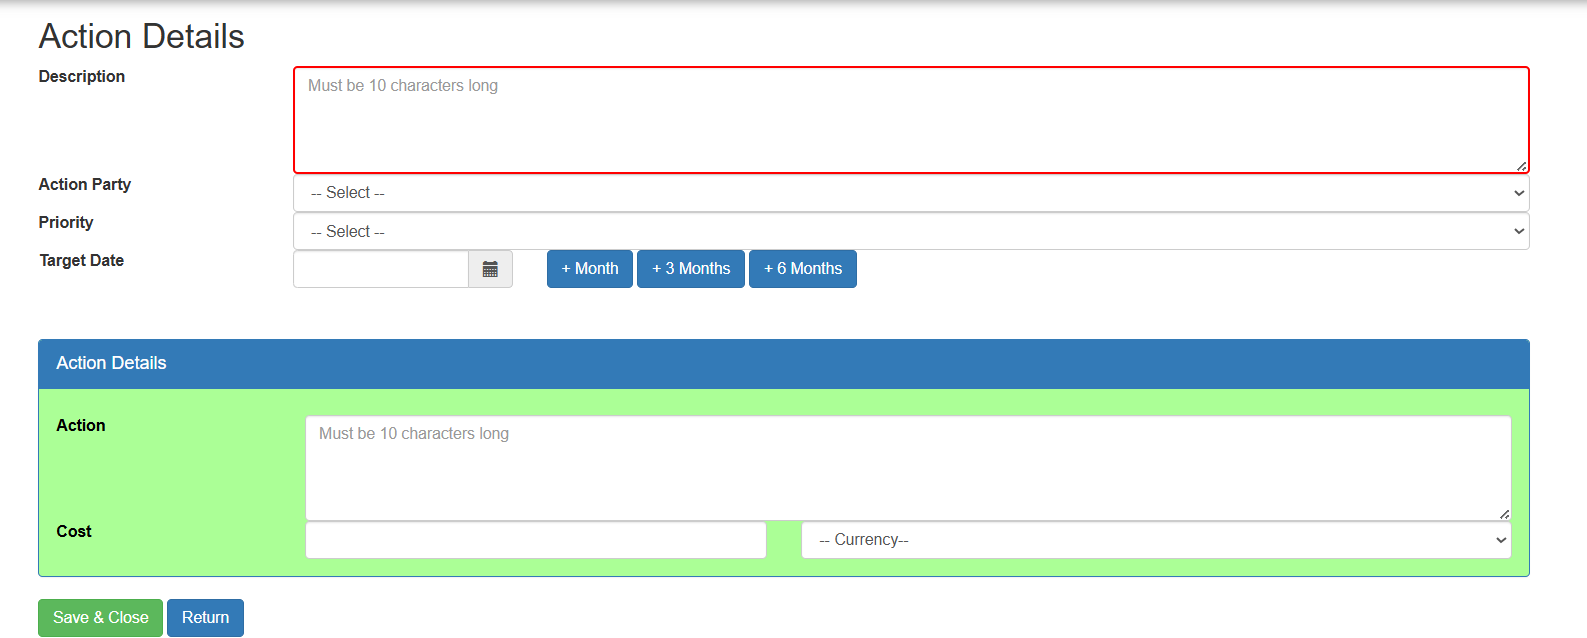
Creating a New Action
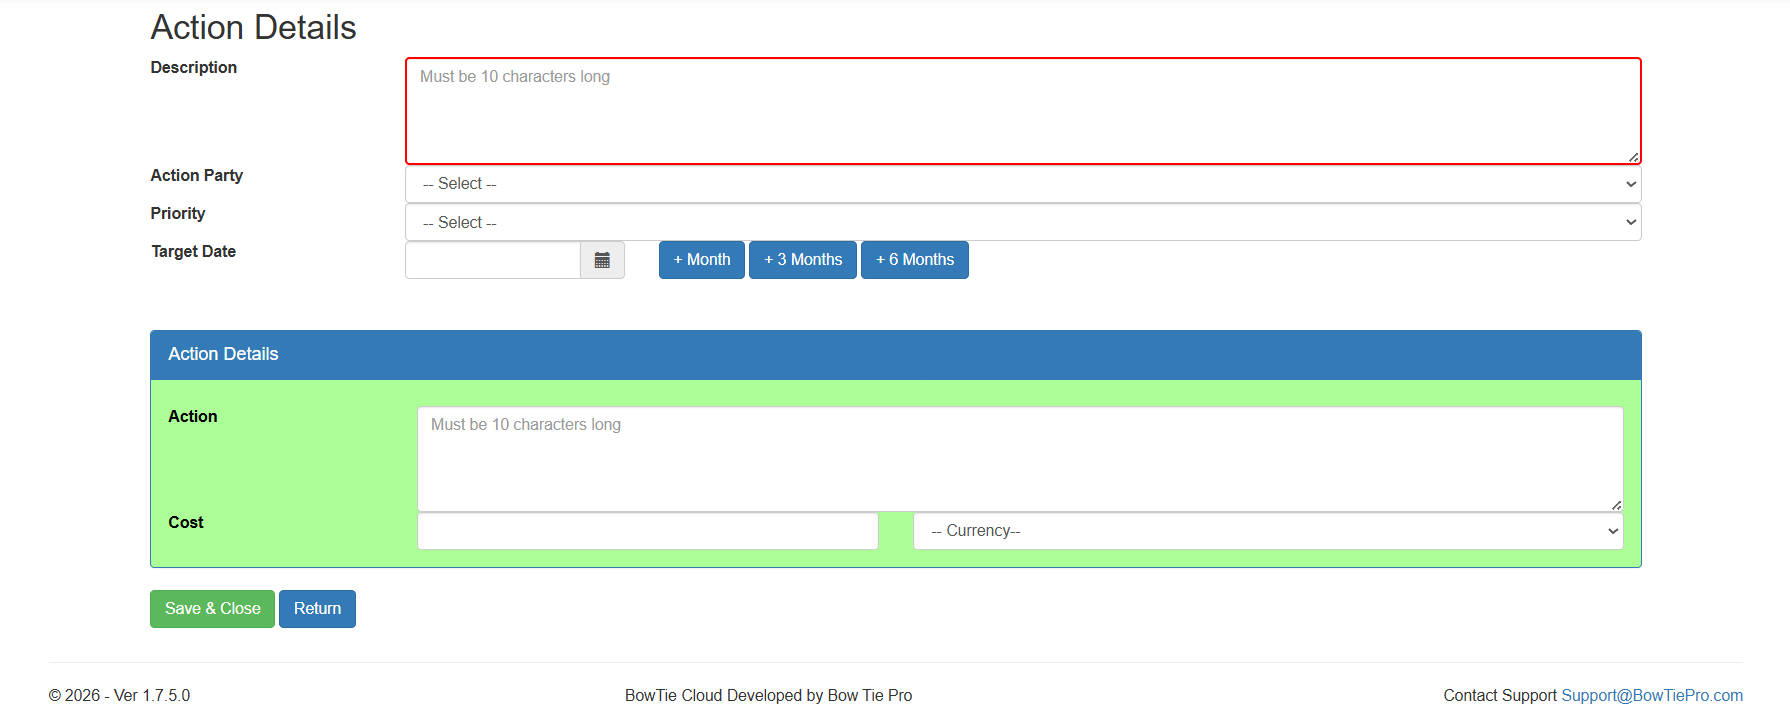
When creating a new action, users must provide the required action details.
The Action Details screen includes fields for:
- Description
- Assigned party
- Priority
- Target completion date
- Action details
- Cost information
These fields help organizations manage accountability and track corrective activities effectively.
Entering the Action Description
The Description field is used to define the issue or task that needs to be addressed.
Action descriptions should:
- Clearly explain the required activity
- Be specific and actionable
- Include enough detail for the assigned party
Example:
Review and update operational maintenance procedures for critical equipment.
Assigning the Responsible Party
The Action Party field allows users to assign responsibility for completing the action.
This helps:
- Establish accountability
- Improve follow-up tracking
- Clarify ownership of corrective activities
Users can select the responsible person or team from the available list.
Setting the Priority
The Priority field defines the urgency or importance of the action.
Prioritization helps organizations:
- Focus on high-risk issues first
- Manage workloads effectively
- Improve operational response times
Priority levels may vary depending on system configuration.
Defining the Target Date
The Target Date field specifies when the action should be completed.
Users can:
- Select a custom target date
- Use quick date options such as:
- +1 Month
- +3 Months
- +6 Months
Setting realistic deadlines helps improve workflow management and action completion.
Adding Action Details
The Action Details section provides additional information related to the corrective or preventive activity.
This section may include:
- Detailed implementation steps
- Operational notes
- Resource requirements
- Additional instructions
Providing complete details improves clarity for the assigned party.
Recording Cost Information
Users can optionally define:
- Estimated cost
- Currency
This helps organizations track operational or corrective action expenses when required.
Saving the Action
After entering all required information:
- Review the action details.
- Click Save & Close.
The action will then appear within:
- The Action List view
- The Action Board view
- Workflow tracking screens
Managing Assigned Actions
Once created, assigned actions can be:
- Updated
- Reviewed
- Reassigned
- Tracked through workflow stages
- Closed after completion
This ensures all activities remain traceable throughout the action lifecycle.
Best Practices
When creating and assigning actions:
- Use clear and descriptive titles
- Assign actions to the correct responsible party
- Set realistic due dates
- Define appropriate priorities
- Include detailed implementation notes
- Regularly monitor action progress
Maintaining accurate action records helps improve accountability and operational risk management.
The Action List screen in BowTiePro provides a centralized location for viewing and managing all actions within the selected case or location.
The screen allows users to:
- Search for actions
- Filter results
- Monitor overdue items
- View open actions
- Export action data
- Create new actions
This helps organizations maintain visibility and control over corrective and preventive activities.
Accessing the Action List Screen
To open the Action List screen:
- Log in to BowTiePro.
- Navigate to the top navigation menu.
- Select Actions.
The system opens the Action List screen automatically.
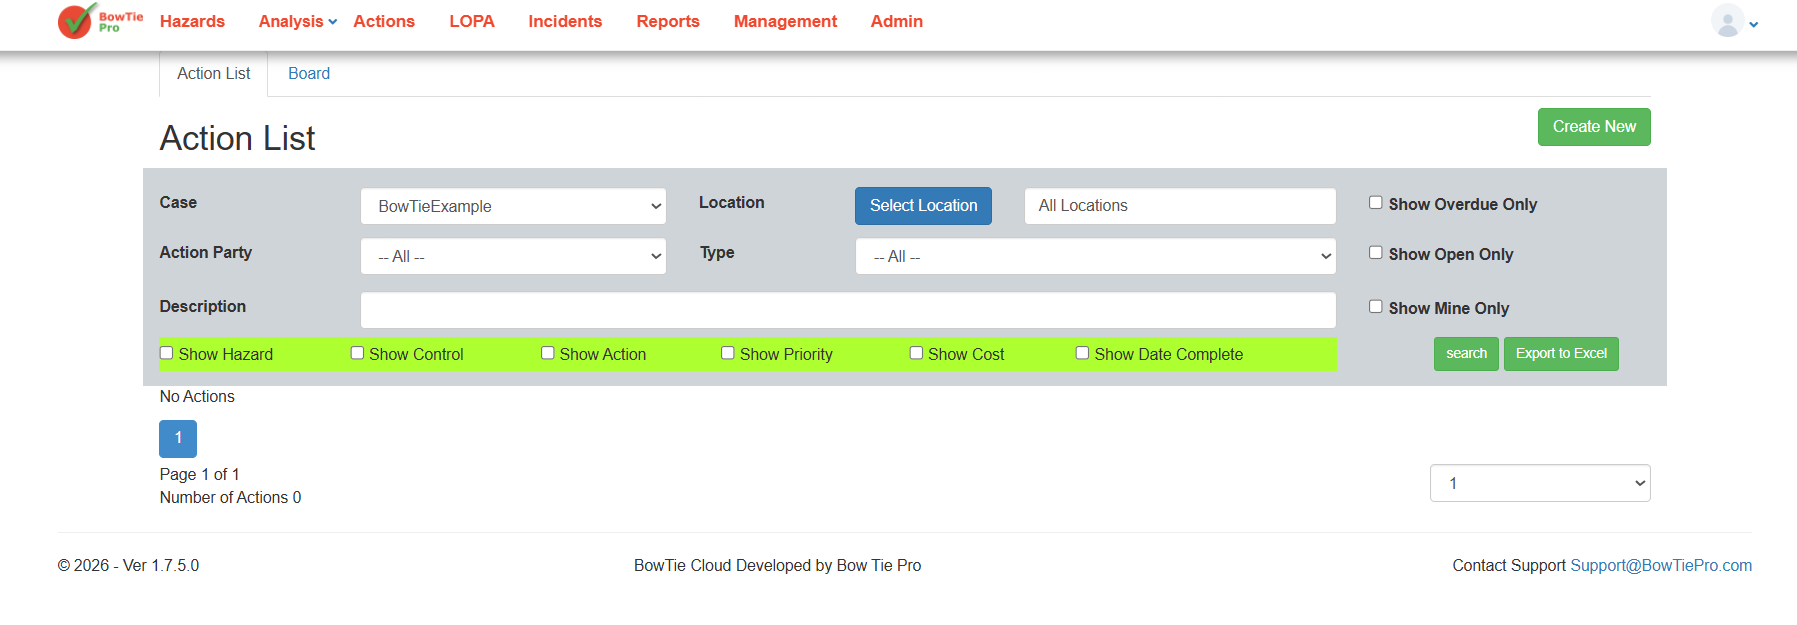
Understanding the Action List Layout
The Action List screen contains several sections used for filtering and managing actions.
Typical sections include:
- Filters
- Search controls
- Action table
- Export options
- Action creation tools
The list view helps users quickly locate and monitor actions across the organization.
Using Filters
The filter section allows users to narrow down displayed results.
Available filters may include:
- Case
- Location
- Action type
- Assigned party
- Status
Filtering helps users focus on specific actions or operational areas.
Searching for Actions
The search field can be used to locate actions using keywords or descriptions.
This helps users quickly find:
- Specific corrective actions
- Assigned tasks
- Operational follow-ups
- Deficiency-related activities
Viewing Overdue and Open Actions
The screen includes options for displaying:
- Overdue actions
- Open actions only
These filters help organizations prioritize unresolved or delayed activities.
Understanding the Action Table
The action table displays detailed information about each action.
Typical columns may include:
- Action ID
- Description
- Assigned party
- Due date
- Priority
- Status
- Location
Users can select actions directly from the table to review or update details.
Creating New Actions
Users can create new actions directly from the Action List screen.
To create a new action:
- Click Create New
- Enter the required action information
- Save the action
New actions are automatically added to the list after saving.
Exporting Action Data
The Action List screen supports exporting action information.
Users can click:
- Export to Excel
to generate downloadable reports for:
- Reviews
- Audits
- Operational meetings
- Progress tracking
Managing Actions from the List
Users can open actions directly from the list to:
- Update status
- Edit details
- Reassign ownership
- Review progress
- Close completed items
This helps maintain centralized workflow management.
Best Practices
When using the Action List screen:
- Regularly review overdue actions
- Use filters to simplify large action lists
- Keep action statuses updated
- Export reports for operational reviews
- Monitor high-priority items closely
- Review open actions frequently
Proper use of the Action List screen helps organizations improve accountability, visibility, and operational follow-up management.
The Action Board View in BowTiePro provides a visual workflow-based layout for managing actions and tracking progress.
Unlike the Action List view, the board view organizes actions into workflow stages, making it easier to:
- Monitor action progress
- Identify overdue items
- Review operational workloads
- Track deficiencies
- Visualize workflow status
The board layout is especially useful during operational reviews and team management activities.
Accessing the Action Board View
To open the Action Board View:
- Log in to BowTiePro.
- Navigate to the top navigation menu.
- Select Actions.
- Open the Board view option.
The system will display actions grouped into workflow columns.
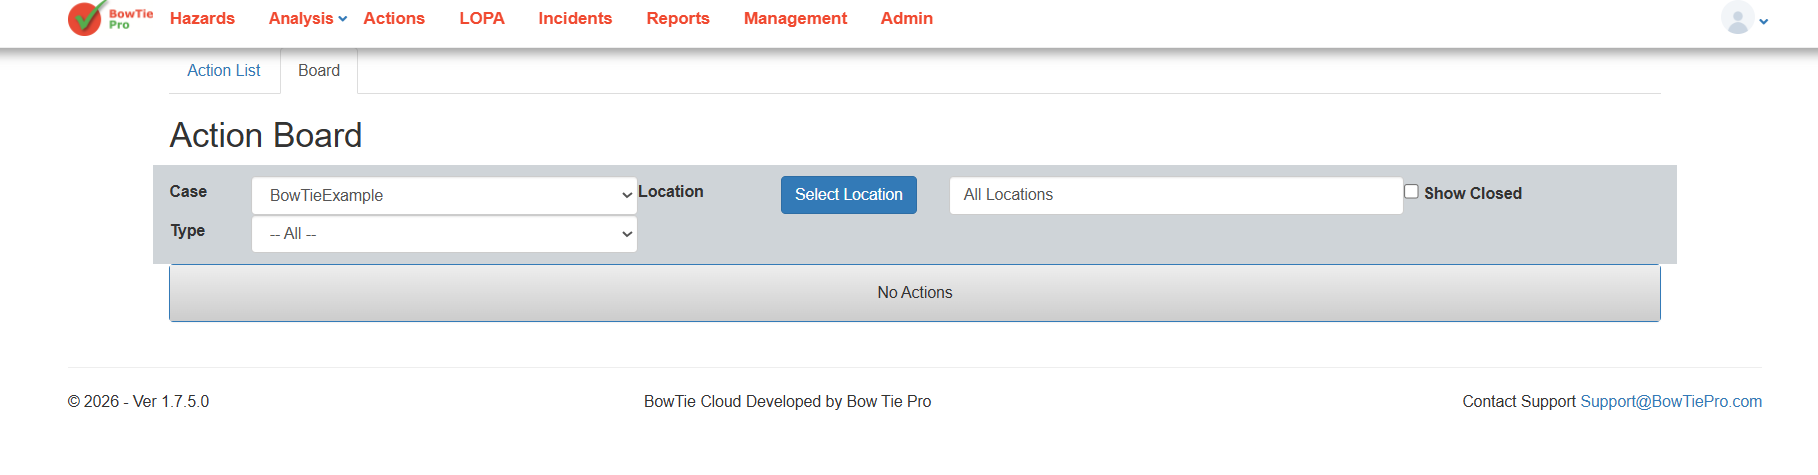
Understanding the Board Layout
The board view organizes actions into separate workflow stages or categories.
Each card on the board represents an individual action.
Depending on system configuration, columns may represent:
- Open actions
- In-progress actions
- Review stages
- Completed actions
- Deficiency-related actions
This visual structure helps users quickly understand overall operational status.
Understanding Action Cards
Each action card may display:
- Action description
- Assigned user
- Priority
- Due date
- Status indicators
- Linked deficiencies
This allows users to review important action details directly from the board view.
Monitoring Workflow Progress
The board view helps users track how actions move through different workflow stages.
Users can quickly identify:
- Actions awaiting review
- Overdue tasks
- Unassigned activities
- High-priority items
- Bottlenecks in operational processes
This improves visibility across operational teams.
Reviewing Action Details
Users can open action records directly from the board view.
Selecting an action allows users to:
- Review detailed information
- Update status
- Edit assignments
- Add notes
- Monitor completion progress
This helps maintain centralized workflow management.
Using the Board View for Operational Reviews
The Action Board View is useful for:
- Team meetings
- Operational reviews
- Progress monitoring
- Deficiency tracking
- Corrective action follow-up
The visual layout simplifies tracking and improves communication between teams.
Benefits of the Action Board View
Using the board view helps organizations:
- Improve workflow visibility
- Monitor action progress more efficiently
- Identify overdue items quickly
- Improve accountability
- Simplify operational follow-up
- Enhance team collaboration
Best Practices
When using the Action Board View:
- Review the board regularly
- Monitor overdue actions closely
- Keep action statuses updated
- Assign ownership clearly
- Use the board during operational meetings
- Follow up on unresolved deficiencies
Maintaining an updated board helps improve operational oversight and action management efficiency.
LOPA (Layer of Protection Analysis) is a risk assessment method used to evaluate whether sufficient protection layers exist to reduce risk to an acceptable level.
In BowTiePro, the LOPA module helps users:
- Analyze threats and consequences
- Apply protection layers
- Configure risk reduction values
- Evaluate acceptance criteria
- Determine whether calculated risk levels are acceptable
LOPA assessments work alongside BowTie diagrams and help provide a more quantitative approach to risk analysis.
What LOPA Does
The LOPA module allows users to:
- Define initiating threat frequencies
- Apply enabling factors
- Configure condition modifiers
- Add Independent Protection Layers (IPLs)
- Configure Probability of Failure on Demand (PFD) values
- Apply acceptance criteria
- Calculate overall consequence frequency
This helps organizations better understand whether existing safeguards are sufficient.
Key Components of LOPA in BowTiePro
LOPA assessments in BowTiePro are built using several key elements.
Threat Frequency
Threat frequency defines how often a threat or initiating event may occur within a given period.
Example:
- 0.1 events per year
Enabling Factors
Enabling factors increase the likelihood of a threat occurring under specific conditions.
Example:
- Lack of level transmitter
- Poor maintenance conditions
Condition Modifiers
Condition modifiers are additional factors that influence consequence probability or severity. These are applied during LOPA calculations to refine the overall assessment.
Independent Protection Layers (IPLs)
IPLs are safeguards or controls designed to reduce risk independently.
Examples may include:
- Emergency shutdown systems
- High-level shutoff systems
- Safety instrumented systems
Each IPL may contain a Probability of Failure on Demand (PFD) value.
Acceptance Criteria
Acceptance criteria define whether calculated risk levels are considered acceptable.
BowTiePro supports configurable criteria such as:
- SIL 1
- SIL 2
- SIL 3
- SIL 4
These values help determine whether additional controls are required.
LOPA Results
After all values are configured, BowTiePro calculates:
- Consequence frequency
- Overall risk values
- Acceptance status
- Whether the assessment meets defined criteria
Results are displayed within the LOPA assessment screens and related hazard views.
Relationship Between BowTie and LOPA
LOPA assessments are linked directly to hazards, threats, and consequences already defined within BowTie diagrams.
This allows users to:
- Visualize hazards using BowTie methodology
- Validate protection effectiveness using LOPA calculations
- Identify areas requiring additional safeguards
The LOPA (Layer of Protection Analysis) module in BowTiePro allows users to create and manage quantitative risk assessments linked to hazards, threats, and consequences.
Users can access the LOPA module directly from the main navigation menu.
Accessing the LOPA Module
To access the LOPA module:
- Log in to BowTiePro.
- From the top navigation menu, click LOPA.
The system will open the LOPA List screen.
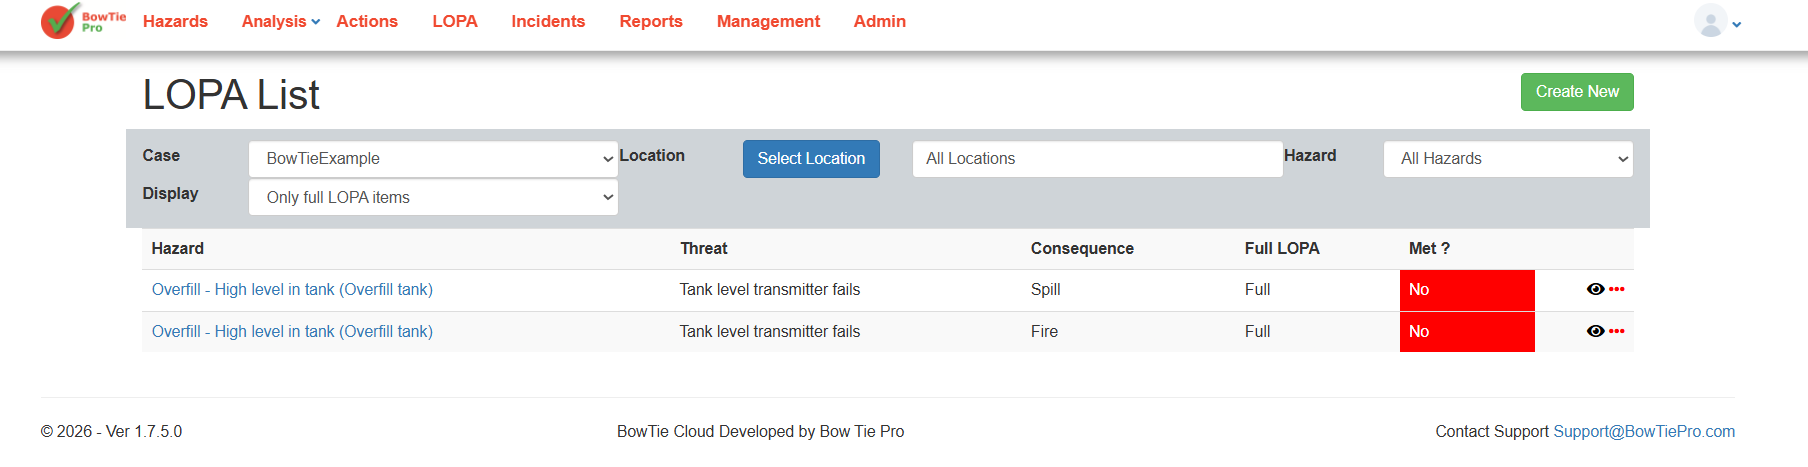
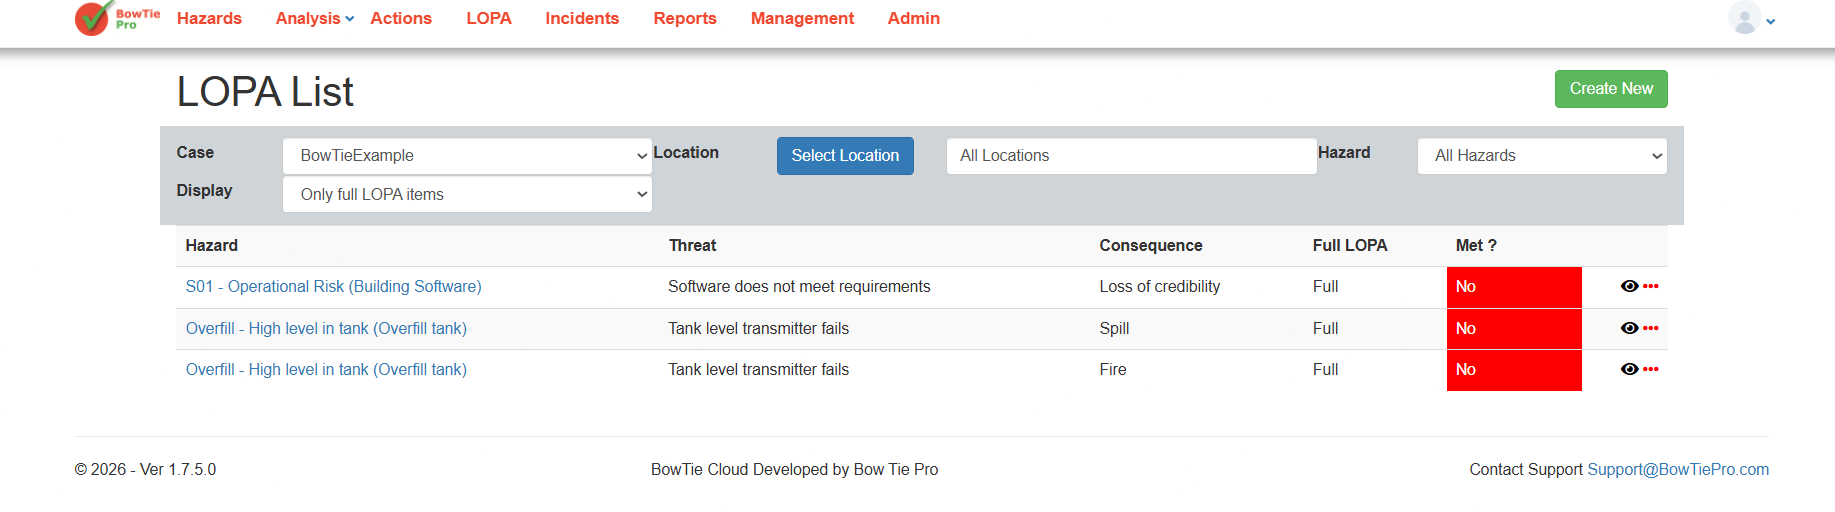
Understanding the LOPA List Screen
The LOPA List screen displays all available LOPA assessments for the selected case.
Each row represents a LOPA assessment linked to:
- A hazard
- A threat
- A consequence
The list helps users quickly review the status of existing LOPA analyses.
Available Filters
The top section of the page contains several filters used to narrow down displayed results.
Case
Select the case containing the required LOPA assessments.
Example:
- BowTieExample
Location
Filter LOPA items by location.
Users can:
- Select a specific location
- View all locations
Hazard
Filter assessments by hazard. This helps users quickly locate specific risk scenarios.
Display
The Display filter controls which LOPA items are shown.
Example:
- Only full LOPA items
Understanding LOPA Columns
The LOPA list includes several important columns.
Hazard
Displays the linked hazard.
Example:
- Overfill – High level in tank
Threat
Displays the initiating threat associated with the assessment.
Example:
- Tank level transmitter fails
Consequence
Displays the consequence being evaluated.
Examples:
- Spill
- Fire
Full LOPA
Indicates whether the assessment is configured as a full LOPA analysis.
Met?
Displays whether the calculated result meets the defined acceptance criteria.
Typical values:
- Yes
- No
Colour indicators may also be displayed for quick visibility.
Creating a New LOPA Assessment
To create a new assessment:
- Click the Create New button.
- Configure the required hazard, threat, and consequence information.
- Continue building the LOPA assessment.
Detailed configuration steps are covered in later articles.
Viewing Existing LOPA Assessments
Users can open existing LOPA assessments directly from the list.
This allows users to:
- Review calculations
- Update controls
- Modify frequencies
- Review acceptance status
BowTiePro allows users to create LOPA (Layer of Protection Analysis) assessments directly from existing hazards, threats, and consequences defined within BowTie diagrams.
Each LOPA assessment is linked to:
- A hazard
- A threat
- A consequence
This helps users evaluate whether existing safeguards reduce risk to acceptable levels.
Opening the LOPA Module
To begin:
- Log in to BowTiePro.
- From the top navigation menu, click LOPA.
The LOPA List screen will open.
Creating a New Assessment
To create a new LOPA assessment:
- Click the Create New button.
The system will open the Available Items screen.
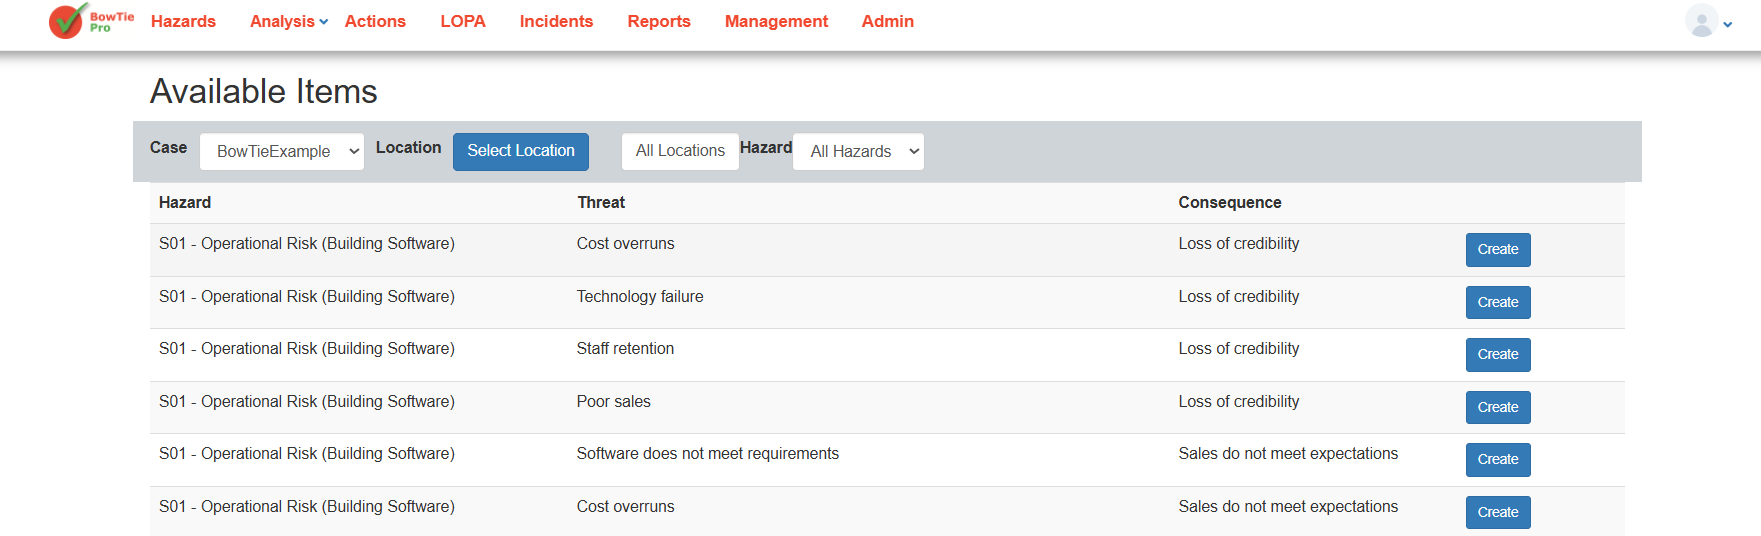
Understanding the Available Items Screen
The Available Items screen displays combinations of:
- Hazards
- Threats
- Consequences
These items are pulled from existing BowTie hazard data.
Users can filter items using:
- Case
- Location
- Hazard
Selecting a Threat and Consequence
To create a LOPA assessment:
- Locate the required threat and consequence combination.
- Click the Create button next to the selected item.
BowTiePro will generate a LOPA assessment for that specific scenario.
Opening the LOPA Diagram
After creating the assessment, the system opens the LOPA Diagram view.
The diagram visually displays:
- Threat frequency
- Protection layers
- PFD values
- Hazard
- Consequence
- Risk calculation flow
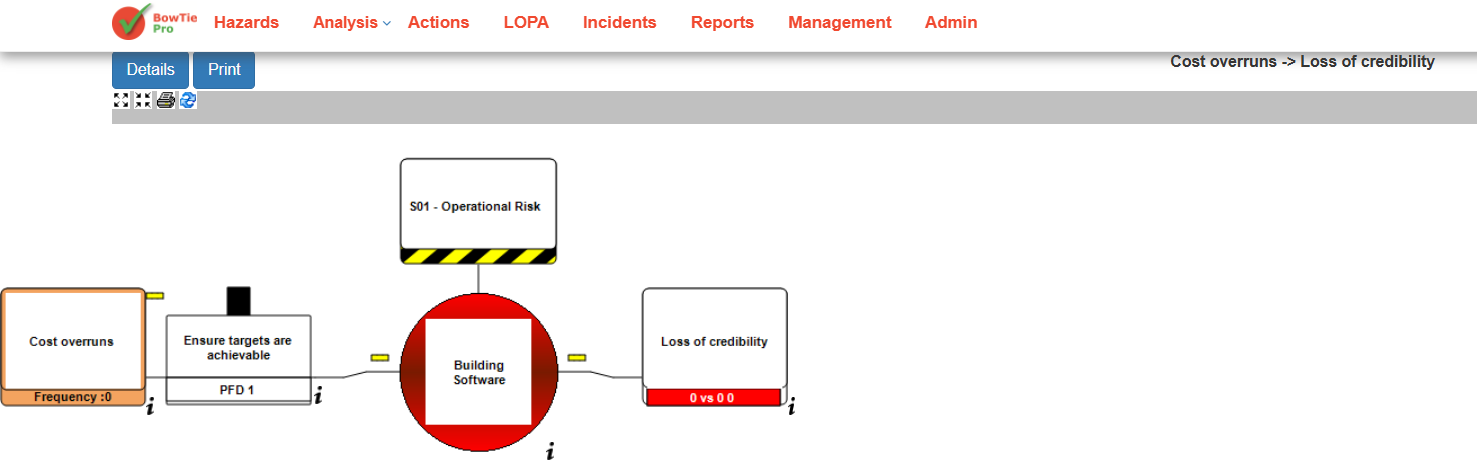
Understanding the LOPA Diagram
The LOPA diagram provides a visual representation of the assessment.
Typical components include:
Threat
The initiating event being analyzed.
Example:
- Software does not meet requirements
Protection Layers
Independent Protection Layers (IPLs) used to reduce risk.
Examples:
- Regular peer reviews
- Functional specification review
- Software testing controls
Hazard
The central hazard associated with the scenario.
Example:
- Building Software
Consequence
The outcome being evaluated if safeguards fail.
Example:
- Loss of credibility
BowTiePro uses Threat Frequency values in LOPA assessments to estimate how often a threat is expected to occur before safeguards and protection layers are applied.
Threat frequency is one of the core components used in LOPA calculations and directly affects the overall risk evaluation of a scenario.
The frequency value works together with:
- Enabling factors
- Condition modifiers
- Independent protection layers (IPLs)
- Probability of Failure on Demand (PFD)
to calculate the final residual risk.
Using accurate threat frequency values helps organizations perform more realistic and reliable risk assessments.
Accessing Threat Frequency Settings
To configure or review a threat frequency value:
- Open the LOPA module from the top navigation menu.
- Open an existing LOPA assessment or create a new one.
- In the LOPA diagram, locate the Threat node on the left side.
- Click the small information (i) icon below the threat.
- Click Edit in the popup window.
This opens the Threat Details screen where the threat frequency can be configured.
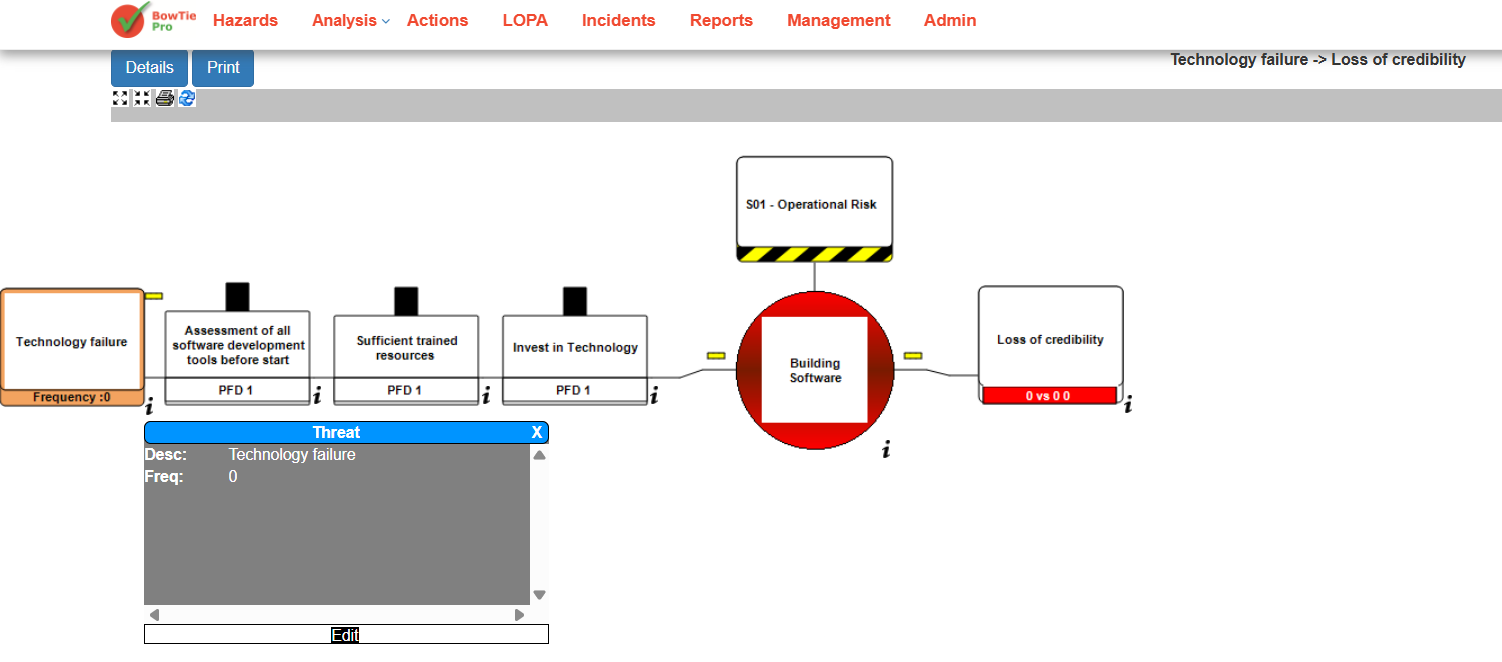
Understanding Frequency in the LOPA Diagram
The LOPA diagram displays the threat frequency directly beneath the threat node.
Example:
- Frequency: 0
This value represents the estimated number of times the threat may occur annually before safeguards reduce the risk.
The displayed value automatically updates whenever changes are saved in the Threat Details screen.
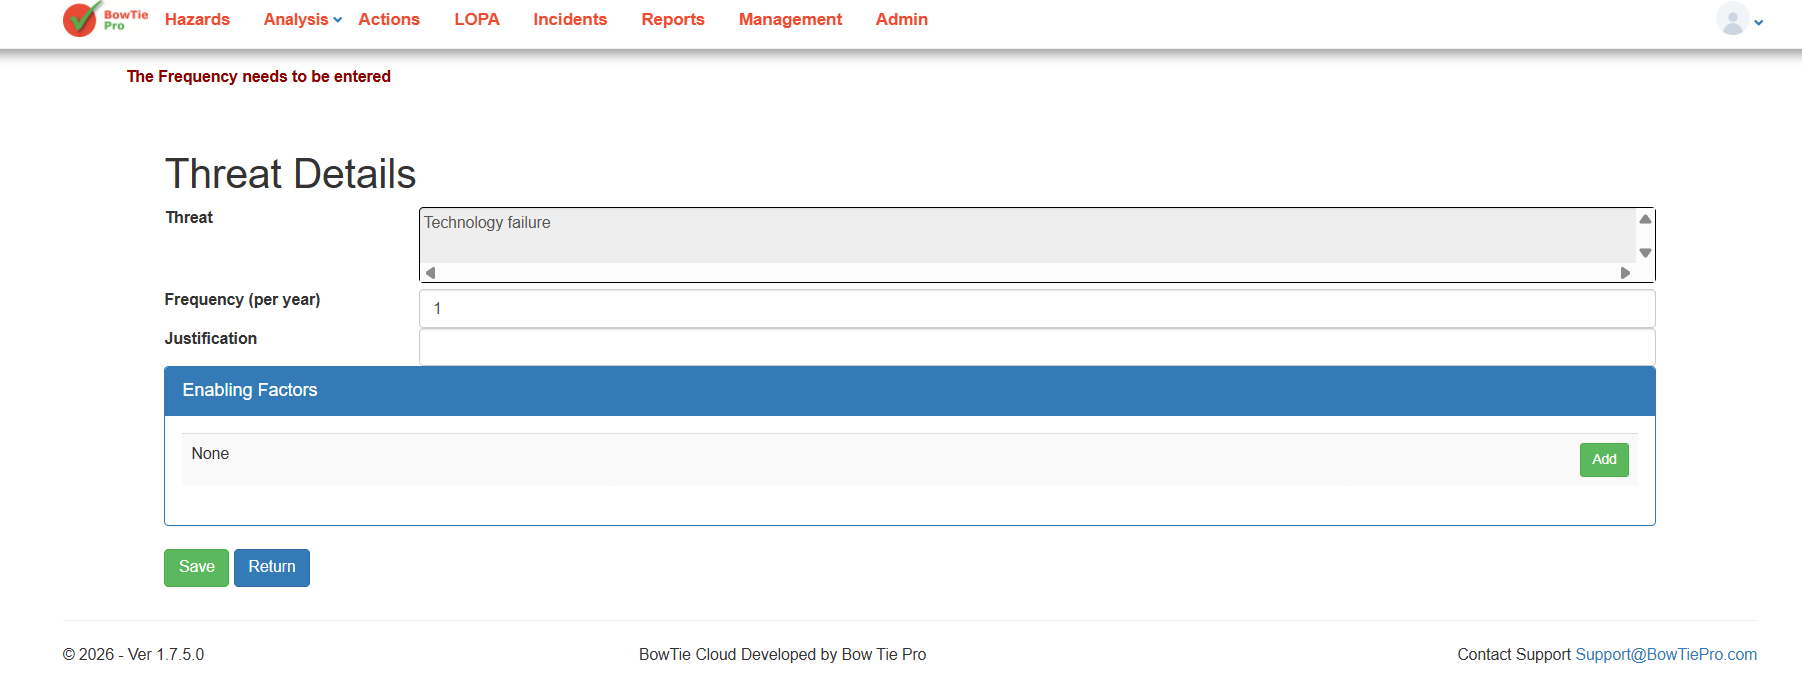
Editing Threat Frequency
After clicking Edit, the Threat Details screen opens.
The following fields are available:
| Field | Description |
| Threat | Name of the identified threat |
| Frequency (per year) | Estimated annual occurrence rate of the threat |
| Justification | Optional explanation for the selected value |
| Enabling Factors | Additional conditions that increase threat likelihood |

Configuring Frequency Values
Enter the estimated occurrence rate in the Frequency (per year) field.
Examples:
| Frequency Value | Meaning |
| 1 | Expected once every year |
| 0.1 | Expected once every 10 years |
| 0.01 | Expected once every 100 years |
The selected value should ideally be based on:
- Historical incident data
- Industry standards
- Engineering analysis
- Expert judgement
- Operational experience
Using the Justification Field
The Justification field allows users to document why a particular frequency value was selected.
This helps:
- Maintain audit records
- Support compliance reviews
- Improve consistency across assessments
- Provide evidence during risk evaluations
Recommended information to include:
- Data source
- Assumptions
- Reference documents
- Historical observations
Understanding Enabling Factors
Enabling factors are additional conditions that may increase the likelihood of the threat occurring.
Examples include:
- Human error
- Poor maintenance
- Environmental conditions
- Equipment degradation
These factors can be added directly within the Threat Details screen and are included in the overall LOPA calculations.
Saving Threat Frequency Changes
After entering or modifying the threat frequency:
- Click Save
- Return to the LOPA diagram
- Verify the updated frequency is displayed beneath the threat node
The updated value will now be included in the overall LOPA risk calculations.
Best Practices
To improve LOPA accuracy:
- Use evidence-based estimates whenever possible
- Avoid arbitrary values
- Document assumptions in the Justification field
- Review frequency values periodically
- Align calculations with organizational risk standards
- Validate calculations during risk review sessions
Conclusion
Threat frequency is a foundational component of LOPA analysis in BowTiePro. Properly configuring frequency values helps organizations produce more accurate risk calculations and better evaluate whether existing safeguards sufficiently reduce operational risk.
Using realistic values, documented assumptions, and properly configured enabling factors improves the overall reliability of the LOPA assessment process.
Enabling factors in BowTiePro are conditions or circumstances that increase the likelihood of a threat occurring. These factors are linked to threats within a LOPA assessment and help provide more accurate and realistic risk evaluations.
Enabling factors are commonly used to represent:
- Human errors
- Environmental conditions
- Equipment issues
- Operational weaknesses
- Process limitations
Adding enabling factors helps organizations better understand the conditions that may contribute to incidents.
Opening the Threat Details Screen
To add enabling factors:
- Open the LOPA module from the top navigation menu.
- Open an existing LOPA assessment diagram.
- Click the small information (i) icon below the threat.
- Click Edit from the popup window.
You will be taken to the Threat Details screen.
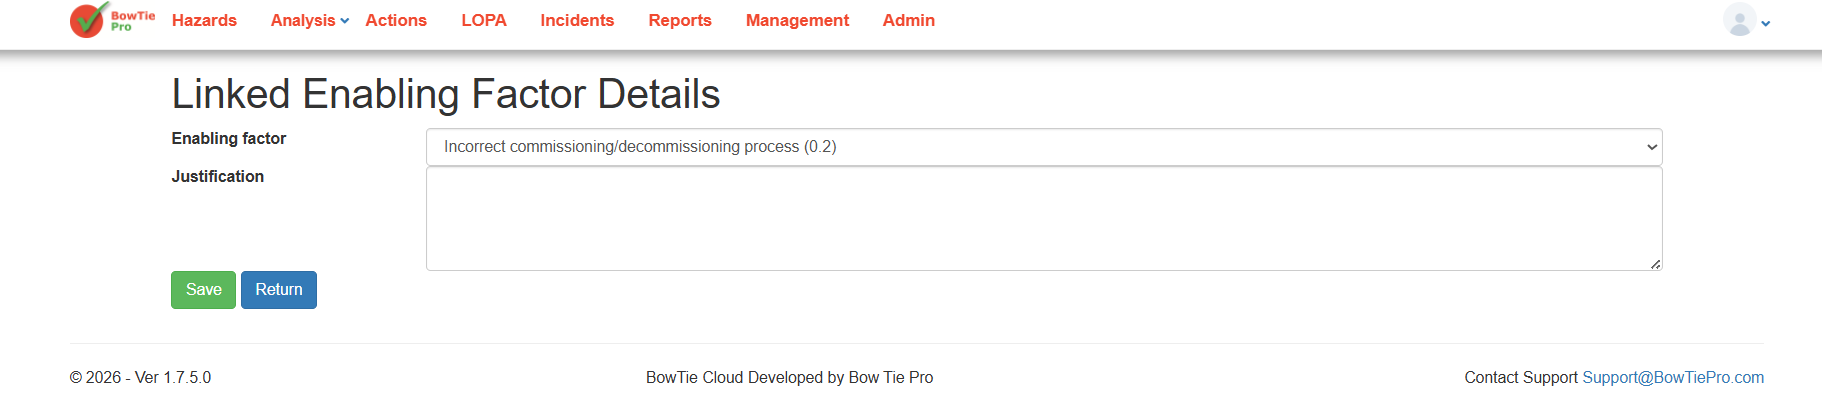
Adding a New Enabling Factor
Inside the Enabling Factors section:
- Click the green Add button.
- The Linked Enabling Factor Details screen will open.
- Select an enabling factor from the dropdown list.
- Enter justification or supporting notes if required.
- Click Save.
The enabling factor will now be linked to the selected threat.
Why Enabling Factors Matter
Enabling factors improve the quality of LOPA analysis by identifying additional conditions that may influence threat occurrence.
Benefits include:
- Better risk visibility
- More realistic threat evaluation
- Improved documentation
- Stronger audit and compliance records
- Enhanced operational risk understanding
Best Practices for Enabling Factors
When adding enabling factors:
- Use clear and meaningful names
- Avoid duplicate entries
- Add proper justification where possible
- Link only relevant factors to each threat
- Review factors regularly as processes change