Condition modifiers in BowTiePro are factors that influence the likelihood or effectiveness of risk scenarios within a LOPA (Layer of Protection Analysis) assessment.
These modifiers help organizations account for additional operational or environmental conditions that may impact the overall risk calculation.
Condition modifiers are commonly used for:
- Human performance conditions
- Environmental influences
- Operational complexity
- Temporary process conditions
- Special operational situations
Using condition modifiers helps create more realistic and accurate LOPA assessments.
Opening the LOPA Diagram
To configure condition modifiers:
- Open the LOPA module from the top navigation menu.
- Open an existing LOPA assessment.
- The LOPA diagram will display:
- Threats
- Controls
- Hazard
- Consequences
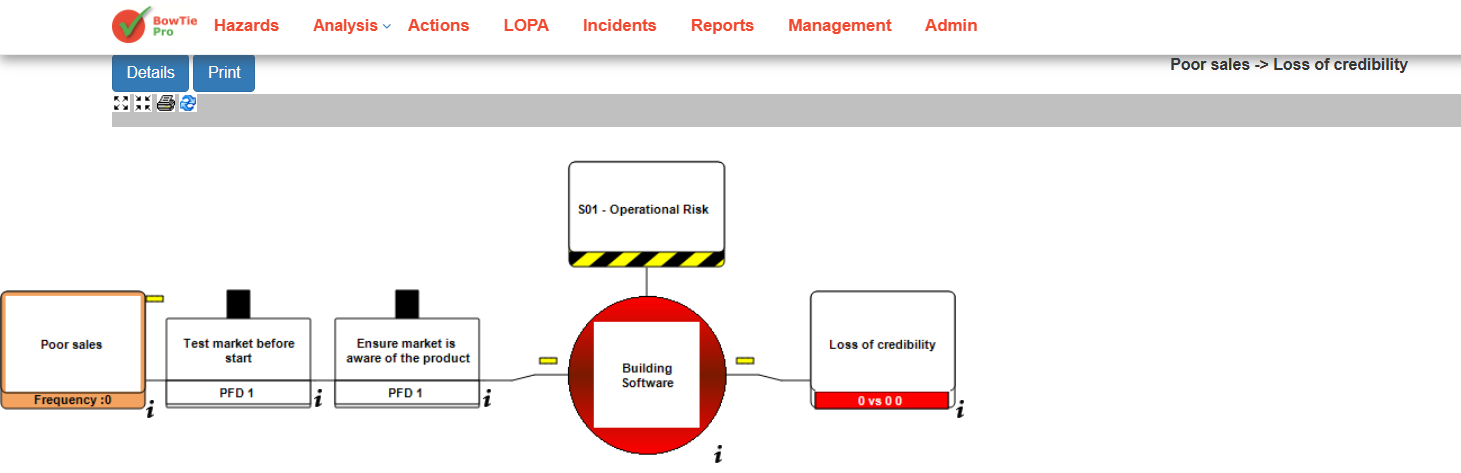
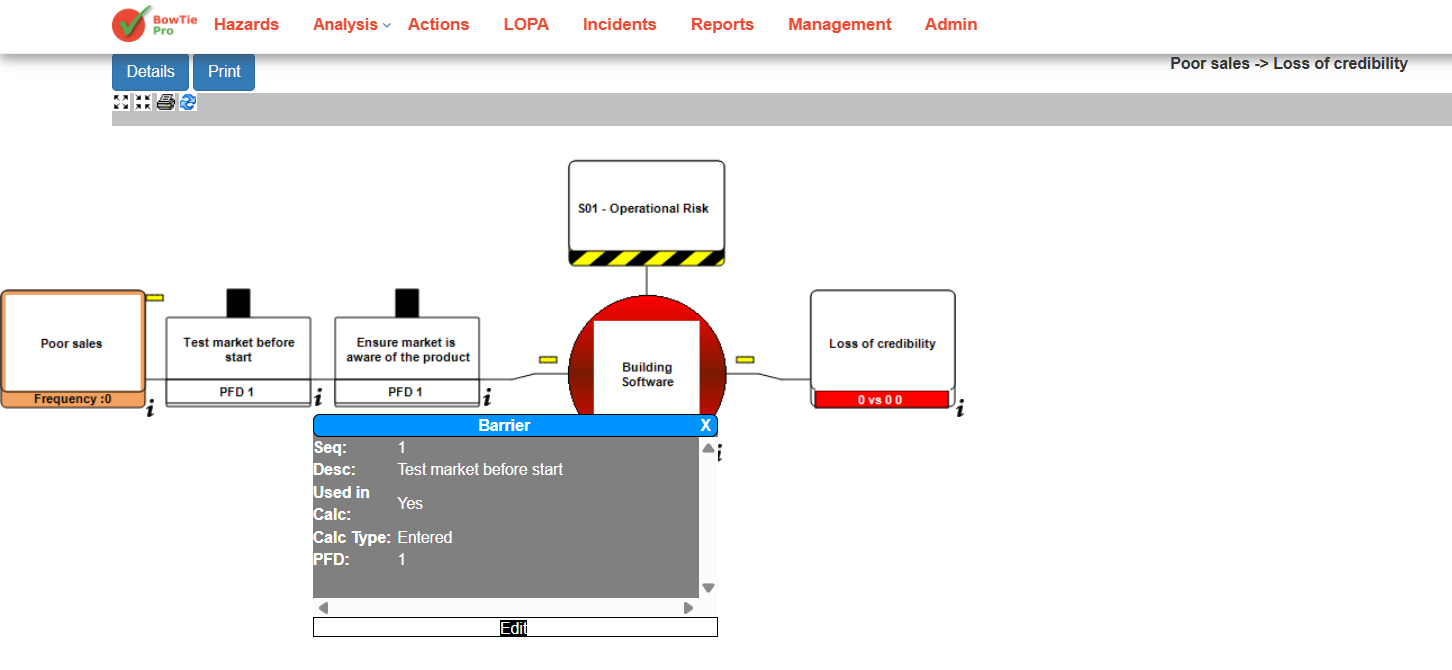
Opening the LOPA Control Details Screen
Condition modifiers are configured through the control/barrier settings.
To open the control details:
- Click the small information (i) icon below a control/barrier.
- A barrier information popup will appear.
- Click Edit.
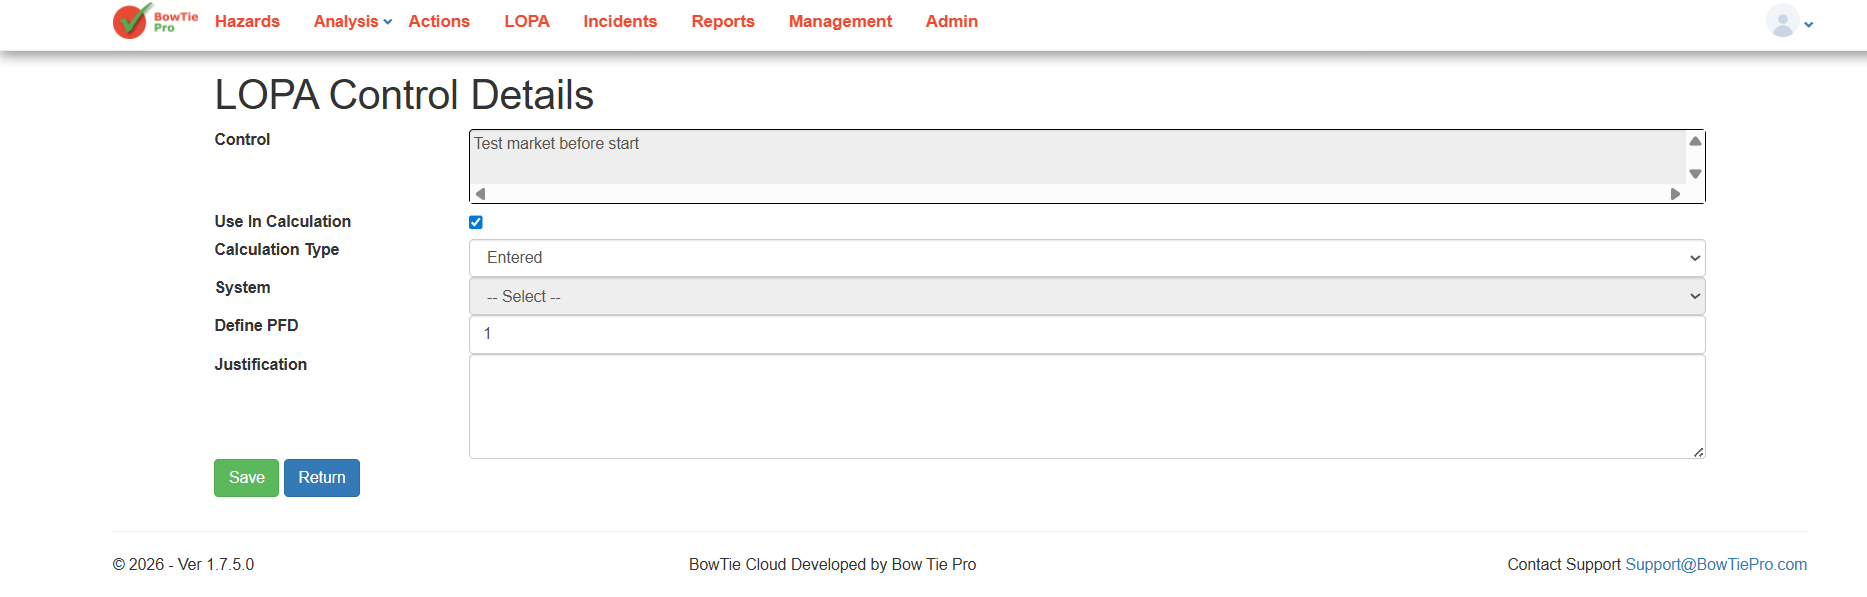
You will be redirected to the LOPA Control Details screen.
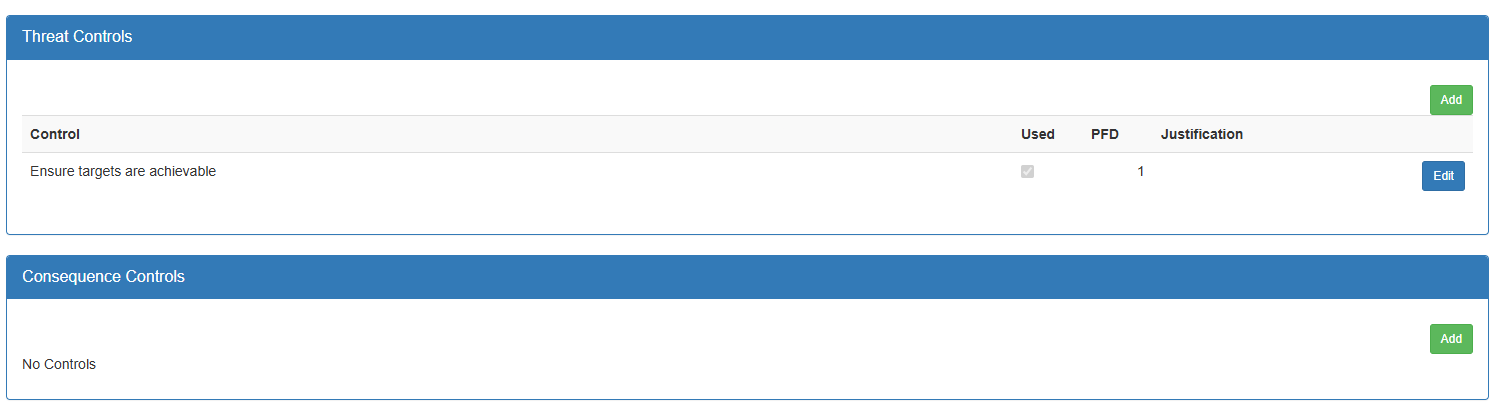
Configuring Control Values and Modifiers
Inside the LOPA Control Details screen, you can configure how the control behaves within the LOPA calculation.
Available configuration options include:
- Use In Calculation
- Calculation Type
- System selection
- Define PFD (Probability of Failure on Demand)
- Justification notes
These values influence the effectiveness of the control and contribute to the final LOPA calculation results.
After entering the required values:
- Review the configuration carefully.
- Enter supporting justification if needed.
- Click Save.
Understanding PFD in Condition Calculations
PFD (Probability of Failure on Demand) represents the likelihood that a control or safeguard may fail when required.
Lower PFD values indicate stronger and more reliable safeguards, while higher values indicate weaker protection layers.
Accurate PFD values are important for:
- Reliable LOPA calculations
- Proper SIL evaluations
- Accurate risk reduction measurements
- Better operational safety decisions
Best Practices for Condition Modifiers
When configuring condition modifiers and control values:
- Use realistic and validated PFD values
- Document justification clearly
- Review calculations regularly
- Avoid overly optimistic assumptions
- Align values with operational standards and procedures
In BowTiePro LOPA assessments, controls are assigned PFD (Probability of Failure on Demand) values to calculate how effective a safeguard is at reducing risk.
PFD values represent the likelihood that a control may fail when required during a hazardous event.
Accurate PFD values are essential for:
- Reliable LOPA calculations
- Proper safeguard evaluation
- Risk reduction analysis
- SIL (Safety Integrity Level) assessment
- Operational safety planning
Opening the LOPA Diagram
To configure control PFD values:
- Open the LOPA module from the top navigation menu.
- Open an existing LOPA assessment.
- The LOPA diagram will display:
- Threats
- Controls/barriers
- Hazard
- Consequences
Opening the LOPA Control Details Screen
PFD values are configured within the control settings.
To open the control details:
- Click the small information (i) icon below a control/barrier.
- A barrier information popup will appear.
- Click Edit.
You will be redirected to the LOPA Control Details screen.

Configuring the PFD Value
Inside the LOPA Control Details screen, locate the Define PFD field.
To configure the value:
- Ensure Use In Calculation is enabled.
- Select the required Calculation Type.
- Enter the desired PFD value in the Define PFD field.
- Add justification or supporting notes if required.
- Click Save.
The configured PFD value will now be used in the LOPA calculation process.
Understanding PFD Values
PFD values determine how reliable a control is during demand situations.
General interpretation:
- Lower PFD values = stronger and more reliable safeguards
- Higher PFD values = weaker safeguards with higher failure probability
For example:
- A PFD of 0.01 indicates a highly reliable safeguard
- A PFD of 1 indicates no effective protection
Organizations should use validated engineering or operational data when assigning PFD values.
Best Practices for Configuring PFD Values
When configuring PFD values:
- Use realistic operational data
- Avoid overly optimistic assumptions
- Review safeguard performance regularly
- Document justification clearly
- Align values with industry safety standards
- Validate values during audits and reviews
Why Accurate PFD Values Matter
Incorrect PFD values can lead to:
- Inaccurate risk calculations
- Misleading LOPA results
- Poor safeguard decisions
- Incorrect SIL determination
- Increased operational risk exposure
Properly maintained PFD values improve both safety and compliance.
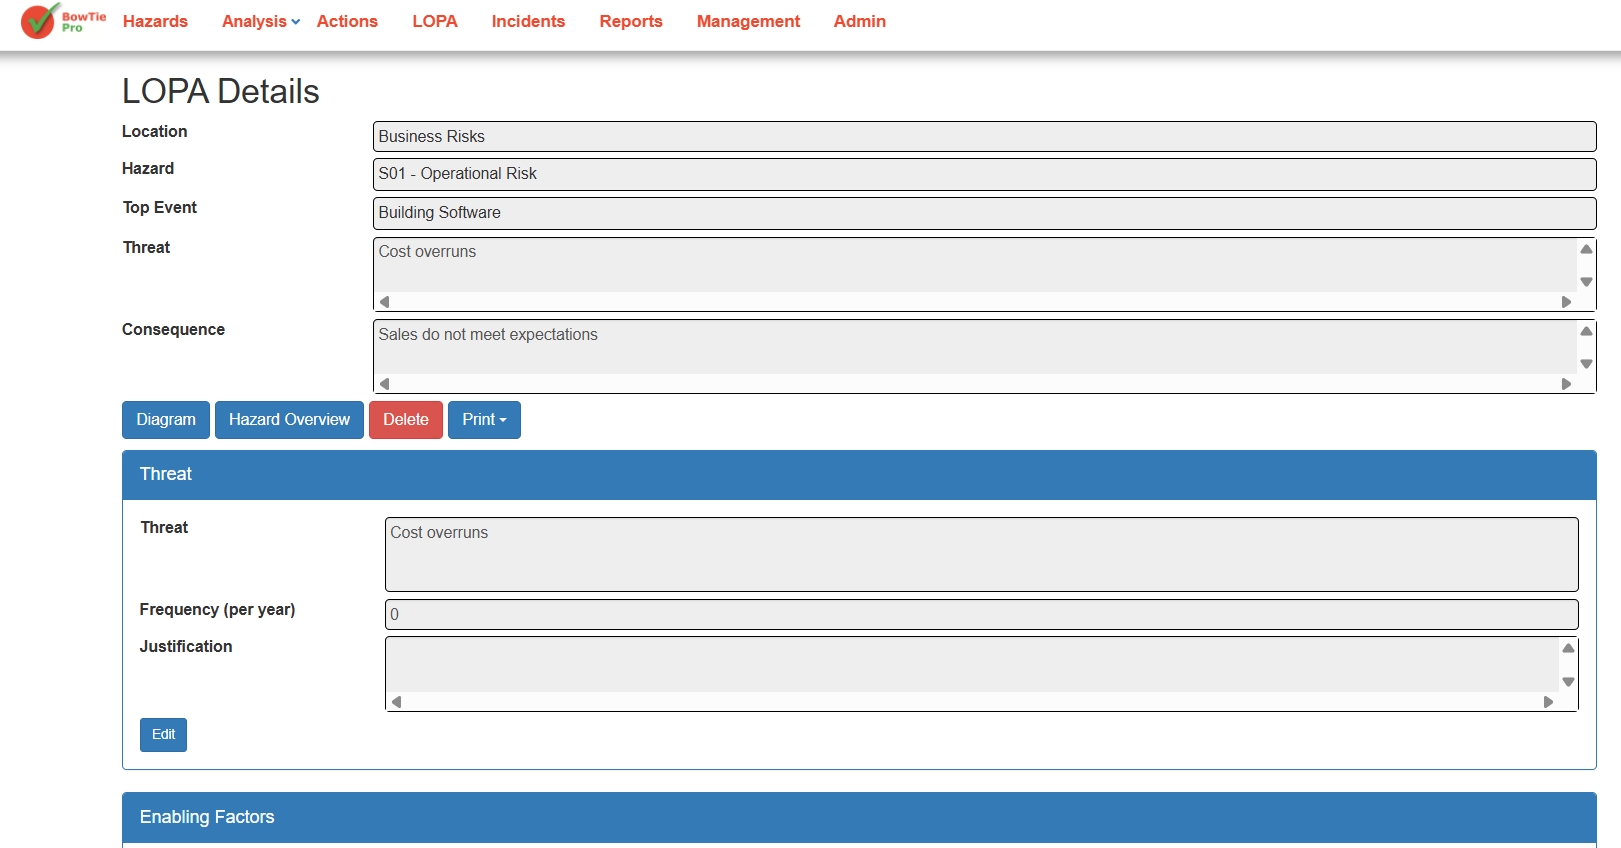
In BowTiePro LOPA assessments, the overall consequence value represents the final calculated risk associated with a specific consequence after considering threats, controls, enabling factors, and condition modifiers.
This value helps users understand whether the remaining risk level is acceptable or if additional protection layers are required.
Viewing Consequence Values
To review consequence values:
- Open the LOPA module.
- Open an existing LOPA assessment.
- Navigate to the LOPA Details page.
- Scroll down to the Consequence section.

The consequence section displays the consequence linked to the selected threat and top event.
Understanding How Consequence Values Are Determined
The final consequence value is influenced by several elements within the LOPA assessment, including:
- Threat frequency
- Enabling factors
- Independent protection layers (IPLs)
- Condition modifiers
- Control PFD values
- Consequence controls
BowTiePro combines these values to determine the remaining risk level after safeguards are applied.
Reviewing Threat and Consequence Controls
Controls directly affect the calculated risk value.
Threat controls reduce the likelihood of the event occurring, while consequence controls reduce the severity or impact after the event occurs.
Each control can include:
- PFD (Probability of Failure on Demand)
- Justification details
- Inclusion or exclusion from calculations
Understanding the Final Result
The overall consequence value helps users determine whether:
- Existing safeguards are sufficient
- Additional IPLs are needed
- The scenario meets acceptable risk criteria
- SIL requirements may be necessary
The value is continuously updated based on the inputs configured throughout the assessment.
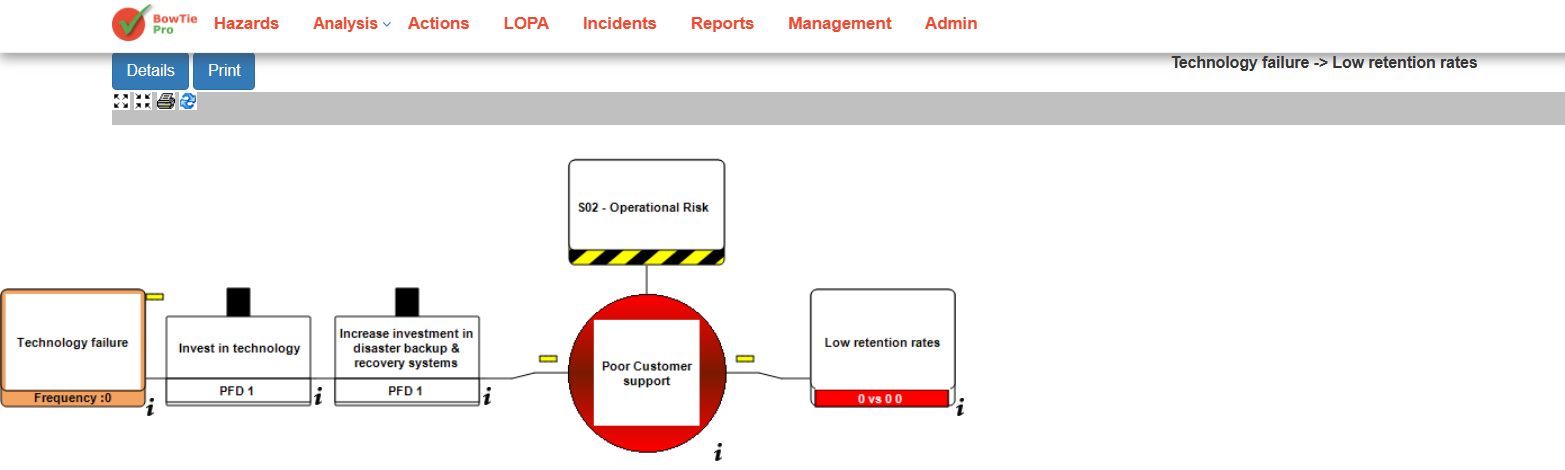
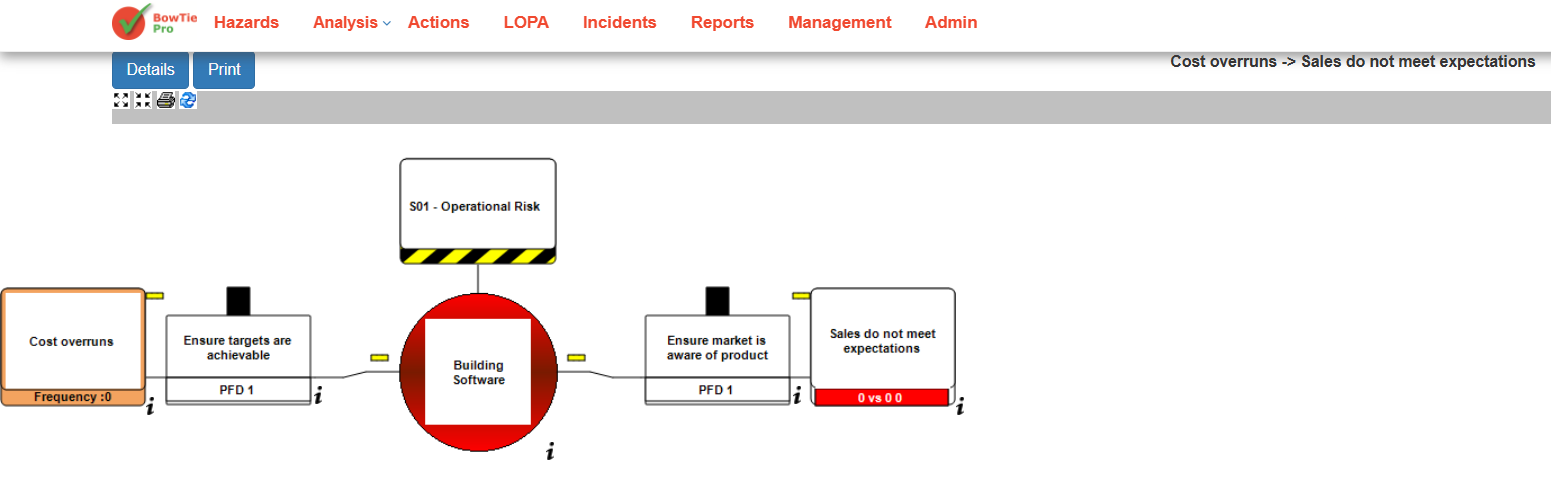
Viewing Consequences in the LOPA Diagram
Users can also visually review consequences directly within the LOPA diagram.
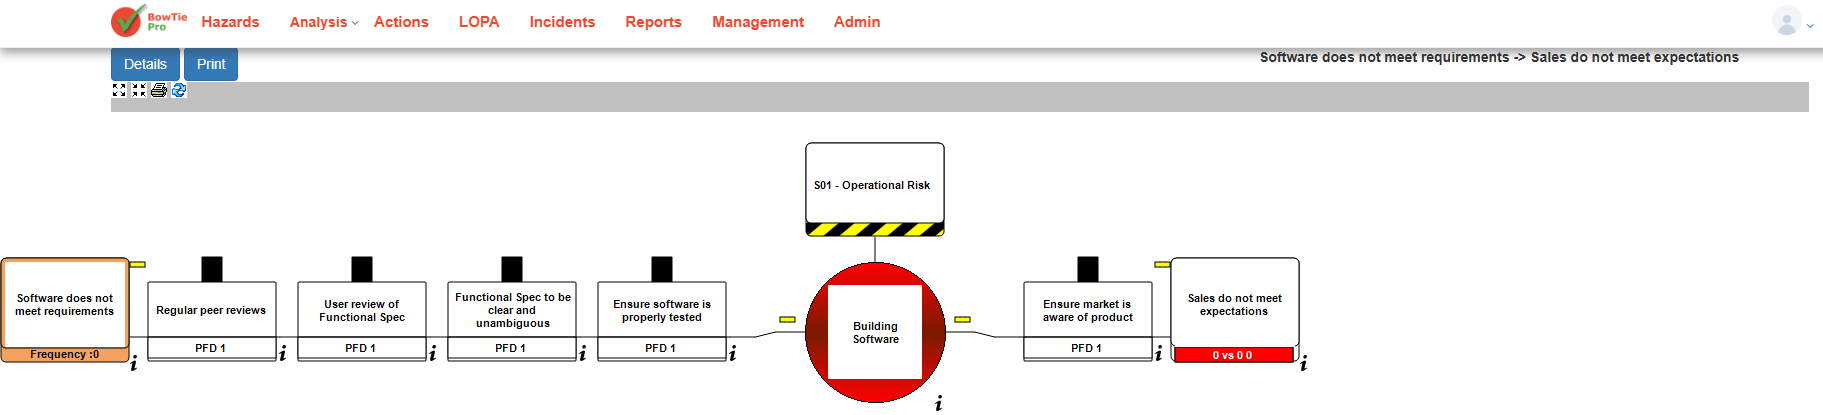
The diagram provides a simplified visual representation of:
- Threats
- Controls
- Top events
- Consequences
- Relationships between protection layers
This helps users better understand how each protection layer contributes to overall risk reduction.
Best Practices
When reviewing overall consequence values:
- Ensure threat frequencies are accurate
- Verify all IPLs are properly configured
- Review PFD values carefully
- Add clear justifications for controls
- Confirm condition modifiers reflect realistic scenarios
- Regularly update assessments when operational changes occur
Accurate configuration ensures more reliable LOPA calculations and better risk management decisions.
After configuring threats, controls, enabling factors, and condition modifiers, BowTiePro calculates the final Layer of Protection Analysis (LOPA) results.
These results help users determine whether existing safeguards reduce risk to acceptable levels.
Viewing LOPA Results
To review LOPA results:
- Open the LOPA module.
- Select an existing LOPA assessment.
- Review the assessment list and detailed analysis screens.
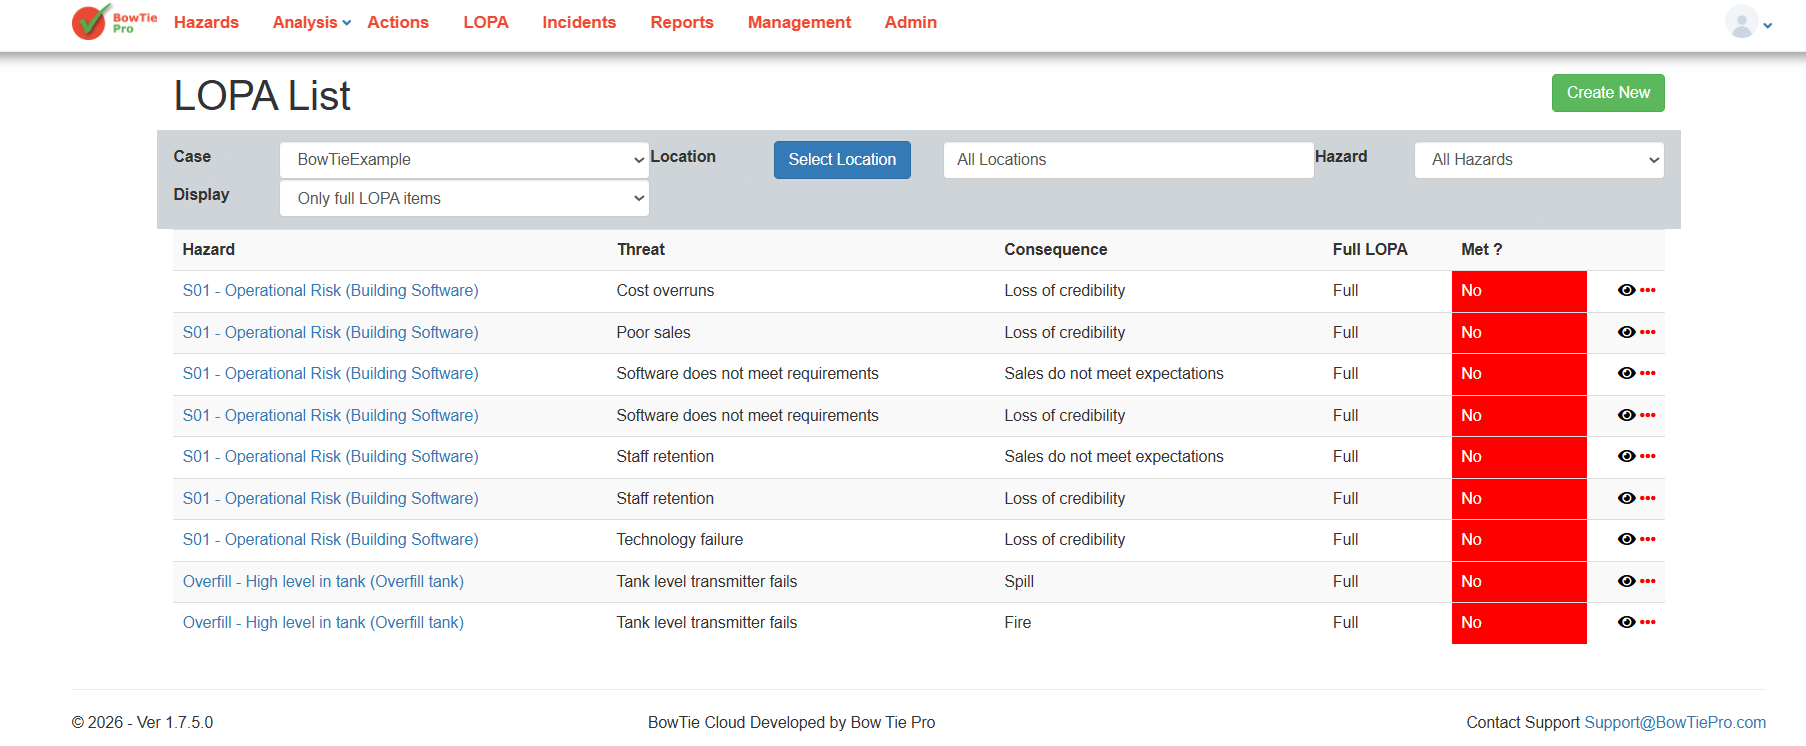
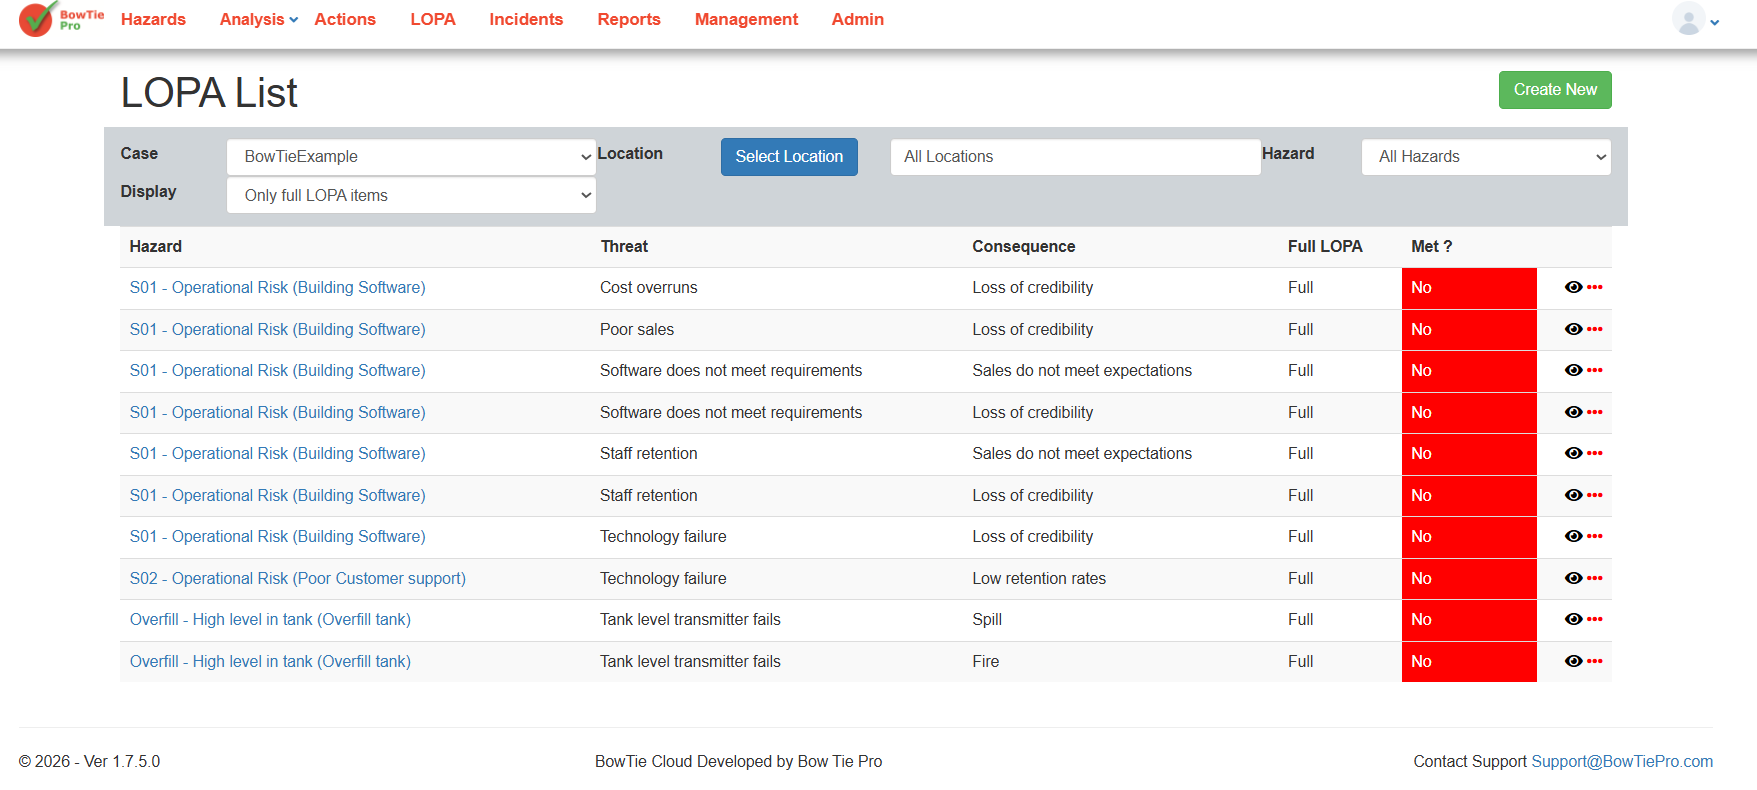
The LOPA List page provides a quick overview of all assessments, including:
- Hazard
- Threat
- Consequence
- Full LOPA status
- Final result status
Understanding the “Met?” Status
The Met? column indicates whether the calculated risk level meets the configured acceptance criteria.
Possible outcomes include:
- Yes — The scenario meets acceptable risk requirements.
- No — Additional safeguards or protection layers may be required.
A “No” result typically indicates that:
- Existing controls are insufficient
- Threat frequency is too high
- PFD values are inadequate
- Additional IPLs may be needed
Reviewing the LOPA Diagram
Users can visually review the assessment using the LOPA diagram.
The diagram displays:
- Threats
- Independent protection layers (IPLs)
- Top events
- Consequences
- Control relationships
- Frequency paths
This visual representation helps users understand how each safeguard contributes to risk reduction.
Reviewing Detailed LOPA Information
Detailed calculation-related information is available within the LOPA Details page.

The details page includes:
- Threat frequency values
- Justifications
- Enabling factors
- Threat controls
- Consequence controls
- Condition modifiers
- PFD values
This information is used by BowTiePro to calculate the final assessment result.
Understanding Risk Reduction
LOPA calculations evaluate how effectively controls reduce the likelihood or impact of hazardous events.
Risk reduction is influenced by:
- Number of protection layers
- Quality of controls
- PFD values
- Threat frequency
- Condition modifiers
- Consequence mitigation measures
Higher-quality and independent safeguards generally improve overall results.
Using Results for Decision Making
LOPA results help organizations:
- Identify weak safeguards
- Determine if additional controls are required
- Improve operational safety
- Support SIL-related evaluations
- Prioritize risk mitigation activities
- Maintain compliance with risk management standards
Best Practices
When reviewing LOPA results:
- Verify all threat frequencies are accurate
- Review all control PFD values carefully
- Ensure IPLs are independent
- Regularly update assessments
- Document clear justifications
- Reassess scenarios after operational changes
Acceptance criteria and Safety Integrity Levels (SIL) are important concepts within Layer of Protection Analysis (LOPA).
BowTiePro uses these concepts to help organizations determine whether existing safeguards reduce risk to acceptable levels.
What Are Acceptance Criteria?
Acceptance criteria define the maximum level of risk considered acceptable for a specific scenario.
Within a LOPA assessment, BowTiePro evaluates whether the calculated residual risk meets these predefined criteria.
If the calculated risk exceeds acceptable limits, additional safeguards or protection layers may be required.
Reviewing Acceptance Status
Users can review acceptance status directly from the LOPA assessment list.
The Met? column indicates whether the scenario satisfies the configured risk acceptance requirements.
Possible results include:
- Yes — Risk is within acceptable limits
- No — Additional risk reduction measures may be needed
Understanding SIL Levels
SIL (Safety Integrity Level) is a measurement used to evaluate the effectiveness and reliability of safety functions and protection systems.
SIL assessments help determine how much risk reduction is required for hazardous scenarios.
Higher SIL requirements generally indicate that stronger or more reliable safeguards are needed.
How BowTiePro Supports SIL-Related Analysis
BowTiePro uses LOPA calculations to help users understand whether current safeguards provide sufficient protection.
The assessment considers:
- Threat frequencies
- Independent protection layers (IPLs)
- PFD values
- Enabling factors
- Condition modifiers
- Consequence controls
These elements collectively contribute to overall risk reduction.
Reviewing Risk Reduction in the LOPA Diagram
The LOPA diagram provides a visual representation of how controls reduce risk between threats and consequences.
The diagram helps users identify:
- Existing protection layers
- Weak or missing safeguards
- Relationships between threats and consequences
- Areas requiring additional controls
Reviewing Detailed Assessment Information
Detailed LOPA calculation information is available within the LOPA Details page.
The details page includes:
- Threat frequency values
- Control PFD values
- Control justification
- Enabling factors
- Condition modifiers
- Consequence information
This information supports risk evaluation and SIL-related decision making.
Understanding “Met” and “Not Met”
A scenario marked as Met generally indicates that:
- Existing safeguards provide adequate risk reduction
- Residual risk is acceptable
- Current controls meet assessment expectations
A scenario marked as Not Met may indicate that:
- Additional IPLs are required
- Existing safeguards are insufficient
- Threat frequency is too high
- PFD values need improvement
Best Practices
When evaluating acceptance criteria and SIL-related assessments:
- Ensure frequencies are realistic and validated
- Use accurate PFD values
- Verify control independence
- Regularly review protection layers
- Document clear justifications
- Reassess after operational changes
Properly configured LOPA assessments help organizations improve safety, strengthen risk management, and support informed operational decisions.
Overview
Creating a hazard is the first step in building a BowTie analysis in BowTiePro. A hazard represents a risk scenario and forms the foundation for defining threats, consequences, and controls.
Steps to Create a New Hazard
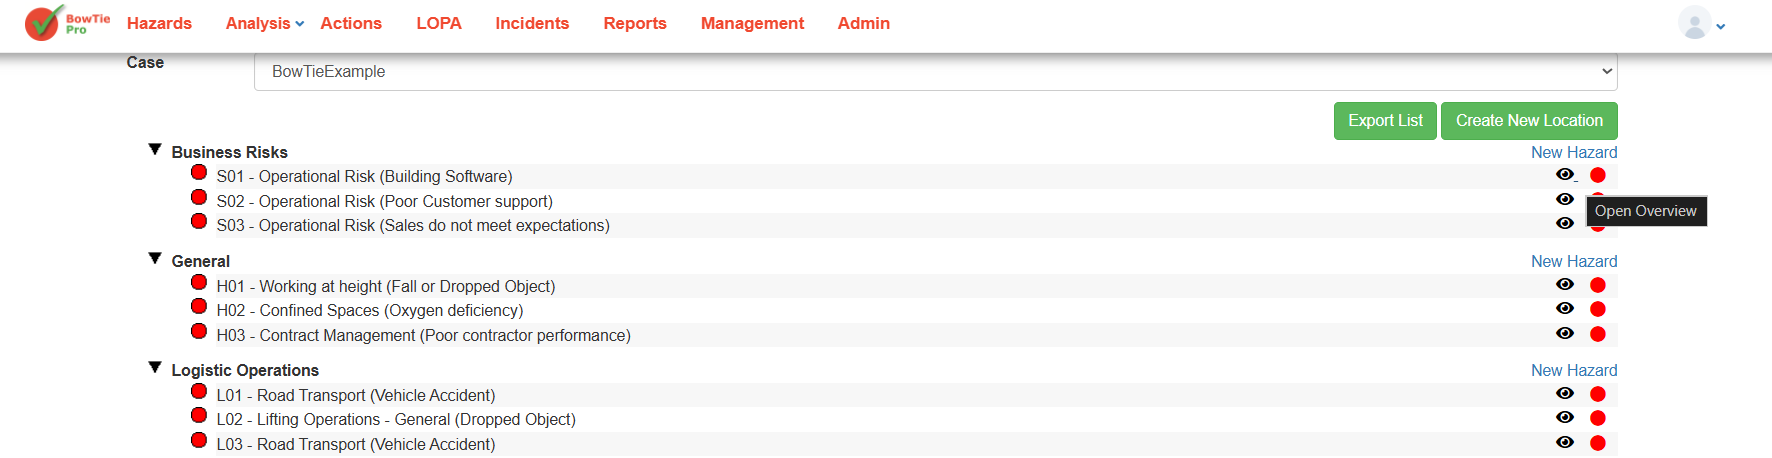
1. Go to the Hazards Section
- From the top menu, click Hazards
- This will open the Hazard List screen
2. Click “New Hazard”
- On the right side of a location group, click New Hazard
- The Hazard Details screen will open

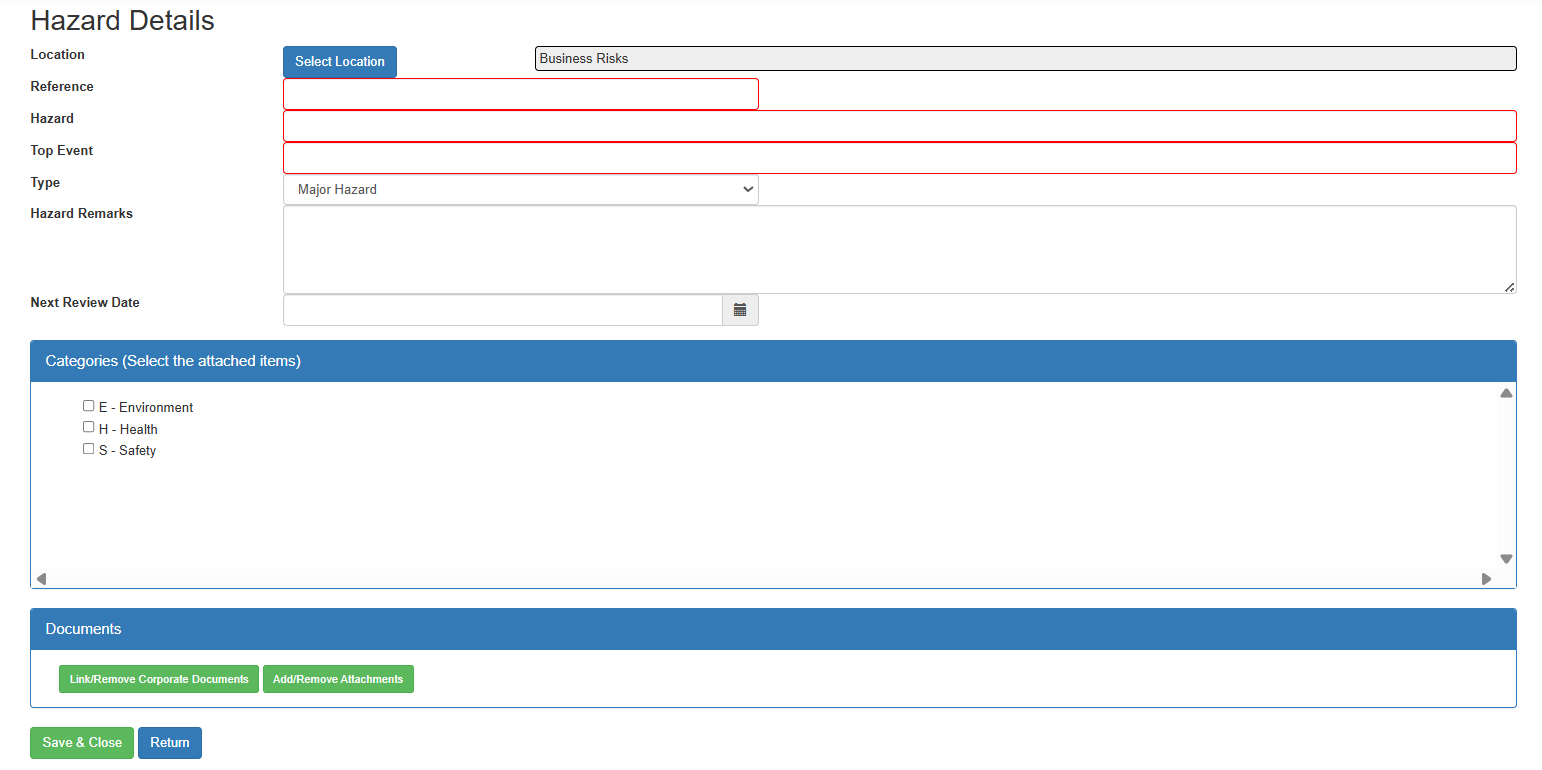
Hazard Details Fields Explained
On the Hazard Details screen, you need to fill in the following fields:
3. Select Location
- Click Select Location
- Choose the appropriate location/category (e.g., Business Risks, General, etc.)
👉 This determines where the hazard will be grouped
4. Enter Reference
- Add a unique Reference for the hazard
- Example: H01, L02, etc.
👉 This helps identify the hazard in lists and reports
5. Enter Hazard
- Provide a clear description of the hazard
- Example: Working at height
👉 This defines the risk source
6. Define Top Event
- Enter the Top Event (loss of control scenario)
- Example: Fall or dropped object
👉 This represents the point where control over the hazard is los
7. Select Type
- Choose the hazard type from the dropdown
- Default example: Major Hazard
👉 This helps classify the severity or category
8. Add Hazard Remarks (Optional)
- Enter any additional notes or context about the hazard
9. Set Next Review Date
- Select a Next Review Date using the calendar icon
👉 This helps schedule periodic reviews
10. Select Categories
- Choose applicable categories such as:
- Environment
- Health
- Safety
👉 These help classify the hazard for reporting and filtering
Final Step: Save the Hazard
Once all required fields are filled:
- Click Save (or equivalent button)
- The hazard will be created and added to the selected location
Creating a hazard in BowTiePro is a straightforward process that sets the foundation for your entire risk analysis. Once created, you can proceed to define threats, consequences, and controls to complete the BowTie model.
Overview
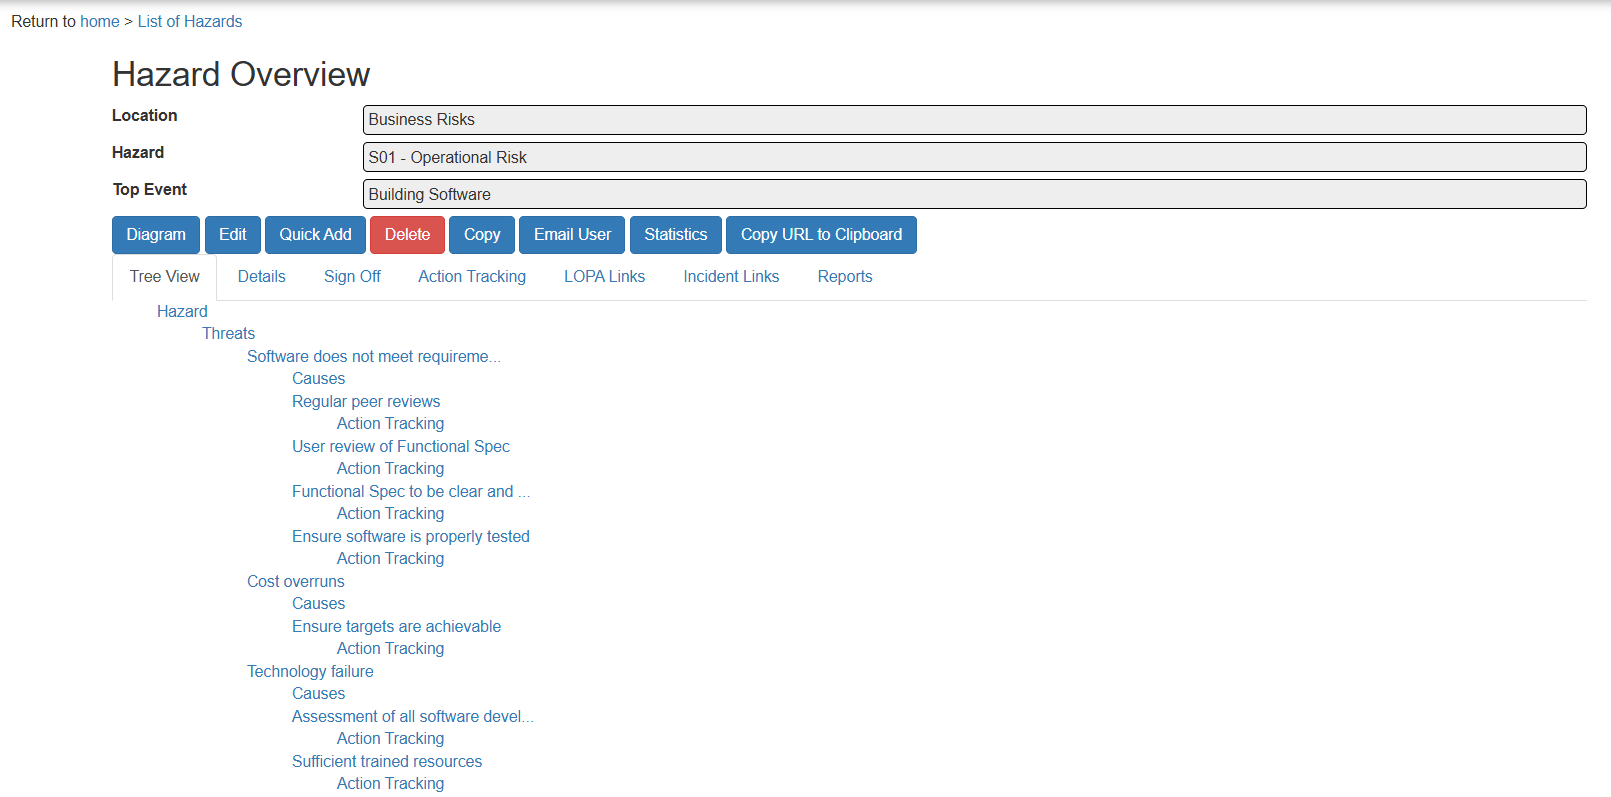
Once a hazard has been created, you may need to update its details such as description, top event, or classification. BowTiePro allows you to easily edit hazard information through the Hazard Overview screen.
Steps to Edit a Hazard
1. Go to the Hazards Section
- From the top menu, click Hazards
- This will open the Hazard List
2. Open a Hazard
- Locate the hazard you want to edit
- Click the 👁 (View) icon next to the hazard

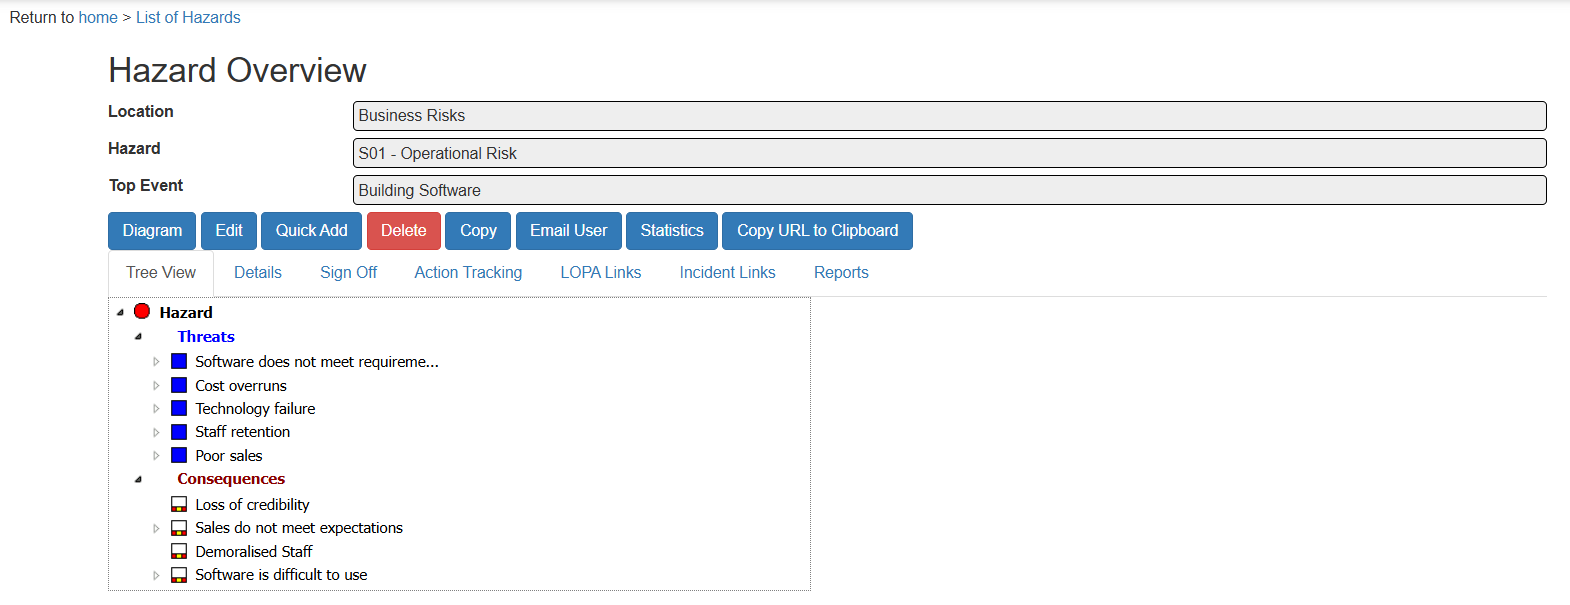
3. Click “Edit”
- On the Hazard Overview screen, click the Edit button. This will open the Hazard Details form with existing values already filled
Updating Hazard Information
On the Hazard Details screen, you can modify the following fields:
Location
- Change the assigned location using Select Location
Reference
- Update the hazard reference code if required
Hazard
- Edit the hazard description
Top Event
- Update the top event (loss of control scenario)
Type
- Change the hazard type from the dropdown
Hazard Remarks
- Add or update additional notes
Next Review Date
- Modify the review date using the calendar picker
Categories
- Update classification (Environment, Health, Safety)
Saving Changes
After making updates:
- Click Save (or equivalent button)
- Your changes will be applied to the hazard
From the Hazard Overview screen, you can also:
- View the BowTie Diagram (Diagram)
- Quickly add items (Quick Add)
- Delete the hazard (Delete)
- Copy hazard details (Copy)
- Email hazard details (Email User)
- View statistics (Statistics)
Editing hazard details ensures that your risk data remains accurate and up to date. This is an important step in maintaining an effective BowTie analysis.
Overview
In BowTiePro, threats and consequences define how a hazard can lead to an event and what outcomes may occur. You can quickly add multiple threats or consequences along with controls using the Quick Add feature.
Accessing the Quick Add Screen
1. Open a Hazard
- Go to Hazards
- Click the 👁 (View) icon next to a hazard
- This opens the Hazard Overview screen
2. Click “Quick Add”
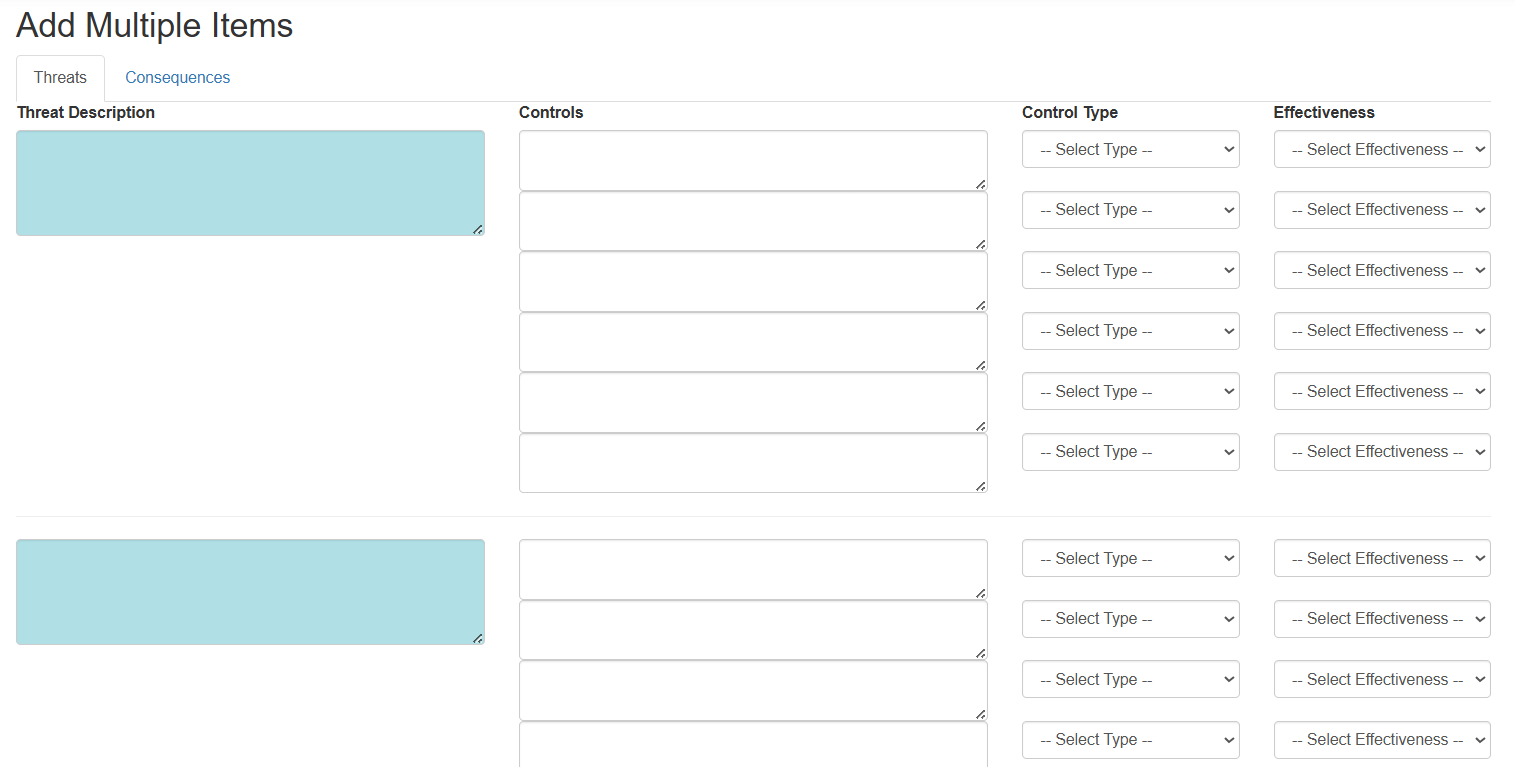
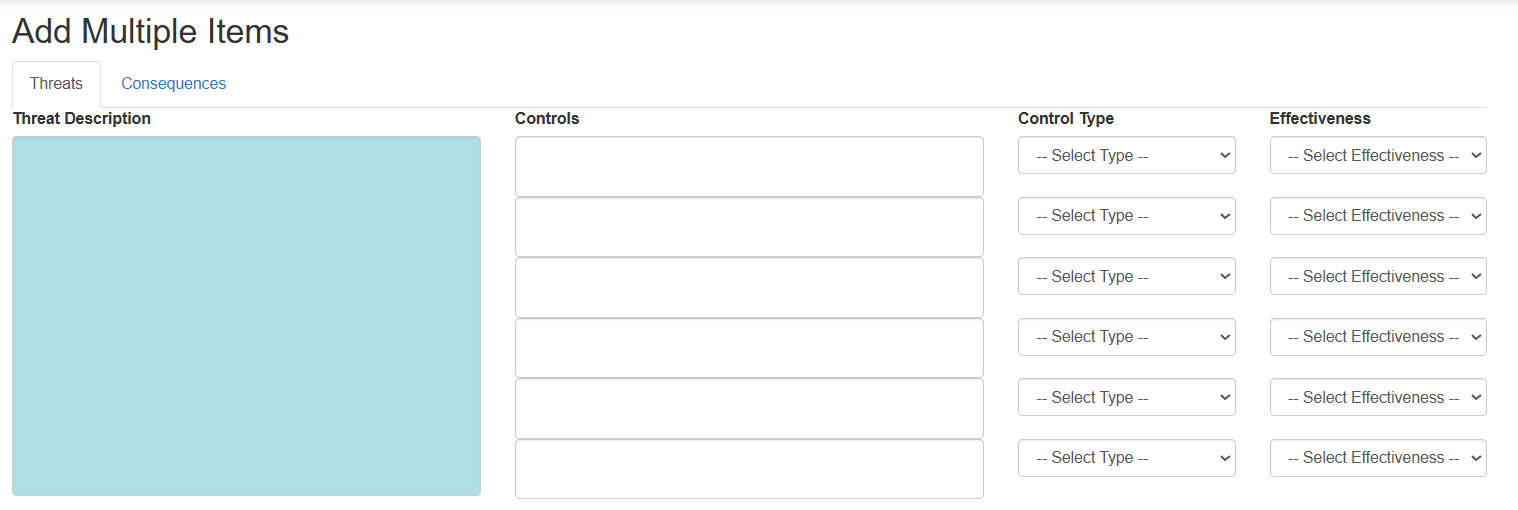
- On the Hazard Overview screen, click Quick Add. This opens the Add Multiple Items screen.
Adding Threats
By default, the Threats tab is selected.
3. Enter Threat Description
- In the Threat Description field, enter the cause of the top event
- Example: Equipment failure, Human error
4. Add Controls for the Threat
- In the Controls fields, enter one or more control measures
- Each row represents a separate control
5. Select Control Type
- Choose a type from the dropdown for each control
- Example: Preventive, Detection, Mitigation (based on system options)
6. Set Effectiveness
- Select the effectiveness level for each control from the dropdown. This defines how strong or reliable the control is
Adding Multiple Threats
- You can repeat the same steps for additional threat blocks on the screen
- This allows you to add multiple threats at once
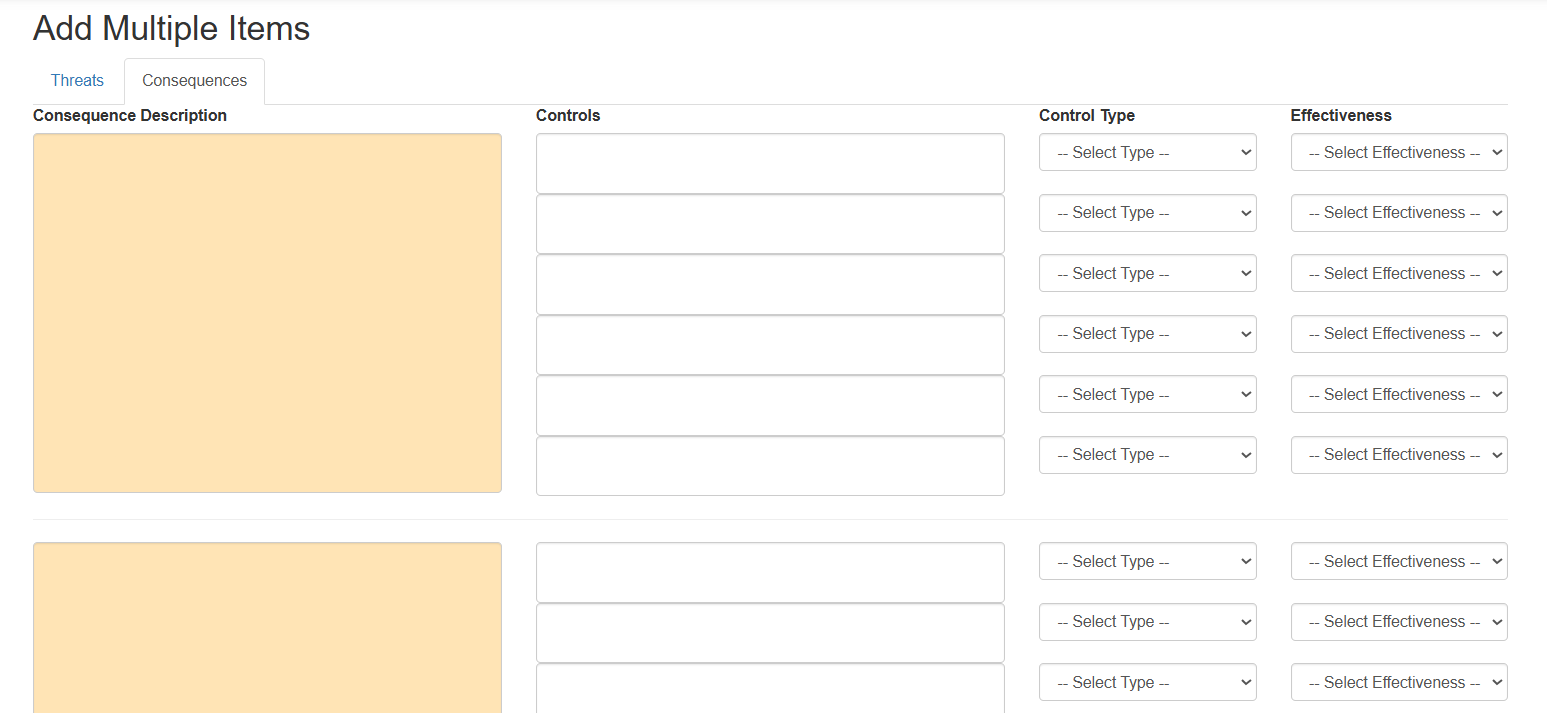
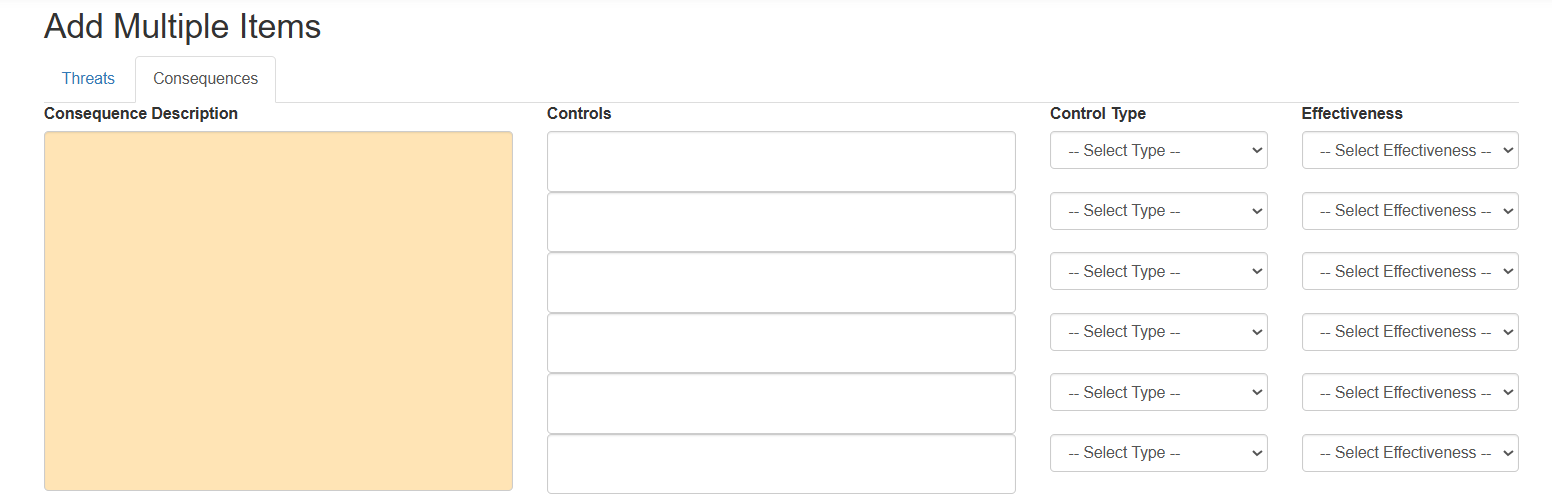
Adding Consequences
7. Switch to “Consequences” Tab
- Click the Consequences tab at the top
8. Enter Consequence Description
- Add the outcome that may occur if the top event happens
- Example: Injury, Equipment damage, Environmental impact
9. Add Controls for Consequences
- Add recovery or mitigation controls in the Controls fields
- Select Control Type and Effectiveness for each
Saving the Entries
- After entering all threats or consequences. Click Save (or equivalent button). All items will be added to the hazard
The Quick Add feature allows you to efficiently create multiple threats and consequences along with their controls. This helps build a complete BowTie model quickly and accurately.
Overview
Controls are critical elements in BowTiePro that help prevent threats from causing a top event or reduce the impact of consequences. Controls are linked directly to threats and consequences and can be added during the risk modeling process.
How Controls Are Structured
In BowTiePro:
- Controls are associated with:
- Threats (preventive controls)
- Consequences (recovery/mitigation controls)
- Controls are not created independently — they are added as part of:
- Threat creation
- Consequence creation
Adding Controls
1. Open a Hazard
- Go to Hazards
- Click the 👁 (View) icon next to a hazard
- This opens the Hazard Overview screen
2. Click “Quick Add”
- On the Hazard Overview screen, click Quick Add
- This opens the Add Multiple Items screen
3. Add Controls While Creating Threats
Under the Threats tab:
- Enter the Threat Description
- In the Controls fields:
- Add one or more control measures
- For each control:
- Select a Control Type
- Select Effectiveness
4. Add Controls for Consequences
- Switch to the Consequences tab
- Enter the consequence description
- Add controls in the same way:
- Define control description
- Select type
- Set effectiveness
Viewing Controls
After saving:
- Go to Hazard Overview → Tree View
- Expand:
- A Threat or Consequence
Controls are linked within these items and contribute to the BowTie structure.
Managing Controls
To update controls:
- Open the hazard
- Navigate to the related Threat or Consequence
- Modify the control details using available edit options (if applicable)
Controls are essential for managing risk in BowTiePro. By linking controls to threats and consequences, you can build a strong and effective risk model that helps prevent incidents and reduce impact.
Overview
Escalation factors are conditions that can reduce the effectiveness of controls in a BowTie model. Managing escalation factors is important to ensure that controls continue to perform as intended and risks remain properly managed.
What Are Escalation Factors?
An escalation factor is something that can:
- Weaken a control
- Cause a control to fail
- Increase the likelihood of a threat leading to a top event
Example:
- A safety system exists (control)
- Lack of maintenance reduces its effectiveness (escalation factor)
Why Escalation Factors Matter
Even if controls are defined:
- They may not always work as expected
- External or internal conditions can affect them
Escalation factors help identify:
- Weaknesses in control systems
- Additional risks
- Areas requiring further attention
How Escalation Factors Are Used in BowTiePro
In BowTiePro:
- Escalation factors are typically linked to:
- Controls
- Or specific parts of the BowTie model
- They are used to:
- Highlight potential control failures
- Improve risk visibility
- Support better decision-making
Managing Escalation Factors
To manage escalation factors:
1. Identify Potential Weaknesses
- Review controls linked to threats and consequences
- Identify conditions that may impact their effectiveness
2. Add Escalation Factors
- Define the condition affecting the control
- Provide a clear description
3. Apply Additional Controls (if required)
- Introduce measures to manage the escalation factor
- Ensure the primary control remains effective
4. Review and Update Regularly
- Monitor escalation factors over time
- Update them as conditions change
Escalation factors help ensure that controls remain reliable under real-world conditions. By identifying and managing these factors, you can strengthen your overall risk management strategy in BowTiePro.