
Overview
In a BowTie, no single control carries the whole burden of managing a risk. Threats and consequences are held in check by the combination of controls working together. Each control is a barrier that should either eliminate the hazard, reduce how often it occurs, or lessen its potential consequences — and it is the collective strength of these barriers, not any one of them alone, that determines how well the risk is managed.
How It Works
Each control acts as a barrier standing in the path of a threat or a consequence. Crucially, the hazard or consequence only materialises when every control on that pathway fails — and which side of the BowTie you are on decides whether that failure lets a top event occur or a consequence unfold.
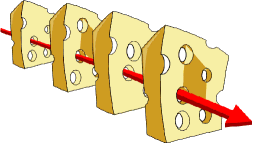
This is the idea captured by James Reason’s “Swiss cheese” model: each barrier is a slice of cheese, and each slice has holes — its weaknesses. A single hole rarely matters, because the next slice covers it. Only when the holes in every slice happen to line up can a hazard pass all the way through.
Controls can take many forms, including physical systems, operational systems, and procedures already in place.
How Many Controls Do We Need?
Sometimes the number of controls needed for a threat or consequence is set by predefined rules, judged as suitable and sufficient for the level of risk. Where that approach is used, the rules should be agreed up front so the method is applied systematically rather than case by case.
One example of such a rule set graduates the requirement by risk level:
| Intolerable Risk | Risk Reduction | Tolerable Risk | |
| Threat Controls | Minimum 3 independent effective control | Minimum 2 independent effective control | Minimum 1 effective control |
| Consequence Controls | Minimum 3 independent effective control | Minimum 2 independent effective control | Minimum 1 effective control |
| Controls for the Threat to the Controls | Minimum 2 independent effective controls | Minimum 1 effective control | Minimum 1 effective control |
The Key Principle: Independence and Effectiveness
For combined protection to hold, each control needs to be both independent and effective.
- Independent means one control’s failure does not drag the others down with it. If a single power cut, a single person, or a single system failure can disable several “separate” controls at once, they were never really independent — and the Swiss cheese slices all have their holes in the same place.
- Effective means the control genuinely does the job it’s credited with, reliably, under the conditions that matter.
Weak or dependent controls give a false sense of security: the diagram looks well protected, but the real-world resilience isn’t there.
Practical Considerations
- Avoid duplicating similar controls. Three variations on the same measure aren’t three barriers — they’re one barrier with one shared weakness.
- Prioritise reliability. A smaller number of dependable, independent controls beats a long list of fragile ones.
- Favour quality over quantity. The goal is genuine protection, not an impressive count.
How Much Is Enough? The ALARP Principle
A common rule is that risk should be reduced to a level that is ALARP — “as low as reasonably practicable.” This means weighing a risk against the trouble, time, and money required to control it further.
“Reasonably practicable” is a narrower idea than “physically possible.” In essence, the risk owner must weigh the size of the risk on one side against the sacrifice — in money, time, or effort — needed to avert it on the other. If there is a gross disproportion between the two, with the risk being insignificant compared to the sacrifice required to reduce it further, then it is not reasonably practicable to do more.
Summary
Effective risk management in a BowTie doesn’t come from any single barrier, but from how well multiple controls work together. Independent, effective controls, layered so their weaknesses don’t overlap, are what stop the holes in the Swiss cheese from ever lining up. Adding more controls only helps if they are genuinely independent and reliable — and the ALARP principle provides a sensible test for knowing when enough has been done.